
How to Use the SKS10 Skull Simulator
How do bone anchored systems work?
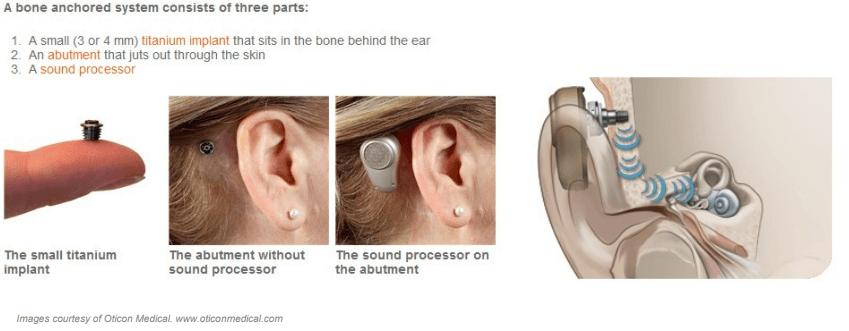
Bone anchored hearing systems transfer sound to the cochlea via direct bone conduction, bypassing the outer and middle ear. This is similar to the way that sound is transmitted to the inner ear when conducting bone conduction audiometry. With bone-anchored hearing devices, however, it is direct bone conduction; that is, the vibrations do not have to pass through the skin. They are sent directly to the cochlea via the bones of the skull. Therefore, the way that sound is conducted to the inner ear is completely different compared to traditional air conduction hearing aids. With air conduction hearing aids, the output of the hearing aid is measured in dB SPL (sound pressure level). With bone anchored devices, the output needs to be measured as output force level, in dB µN (micro Newton).
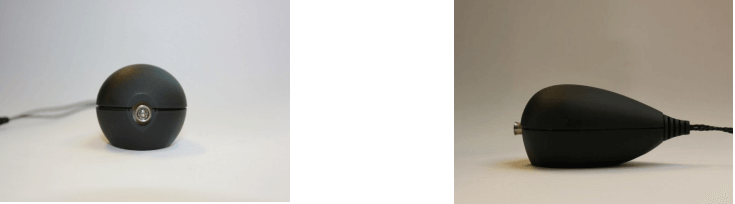
What is a skull simulator?
Similar to a 2cc coupler used with traditional air conduction hearing aids, the skull simulator is a coupler on which bone anchored hearing devices can be attached. It will convert the force output of the bone-anchored device to an electrical signal. With this new device, end users will be able to perform measurements on bone anchored hearing devices and evaluate if they are functioning as expected or not.
How does it work?

Required equipment
- The Affinity2.0 hardware
- The Interacoustics SKS10 Skull Simulator and its power supply
- The HIT440 Software license
- The SKS10 Skull Simulator license
- A bone anchored device
- Optional: the TBS25 passive HIT box
Installing the skull simulator license in the HIT440 Software
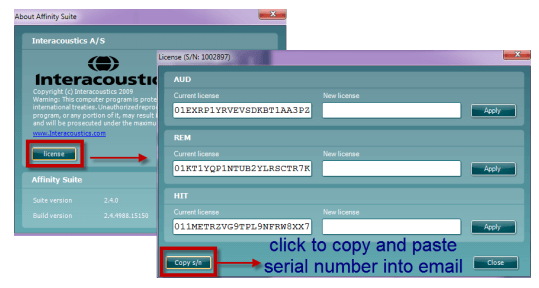
- After purchasing the SKS10 and the license, please send Interacoustics (
service@interacoustics.com ) the serial number. - To copy the serial number: go to Menu/Help/About, click on License and select “Copy s/n”; this will copy the serial number to the Clipboard.
- Paste the serial number in the body of an email and mail it to Interacoustics.
- Interacoustics will then email a new HIT license
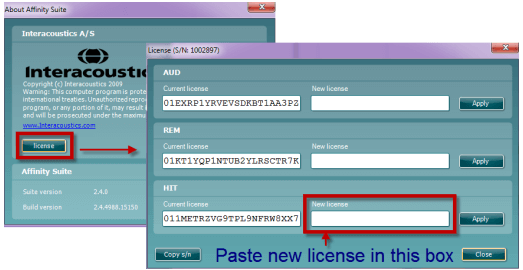
Activating the new HIT license
- Go to HIT module/Menu/Help/About.
- Click on License.
- Paste the new license number under HIT/New license.
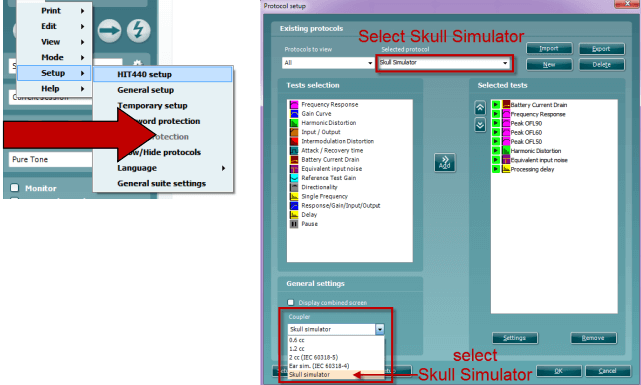
How to activate the skull protocol in the software
- Go to HIT/Menu/Setup/HIT440 setup.
- Choose “Skull Simulator” under “Selected Protocols”.
- Under “General Settings”, ensure that “Skull Simulator” is chosen under “Coupler”
Using the SKS10 with the Affinity2.0
- Connect the skull simulator to its external power supply.
- Plug the power supply into the wall socket

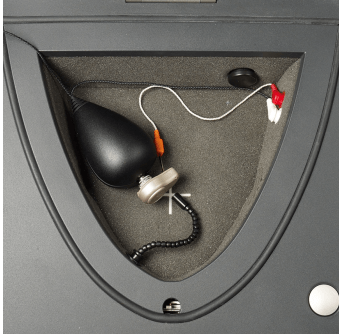
- Place the skull simulator in the test chamber.
- Plug it into the measurement microphone plug of the Affinity2.0 test chamber.
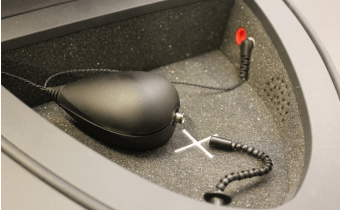
NOTE: it is also possible to use the SKS10 with the TBS25 test chamber - Snap the bone anchored device onto the abutment of the skull simulator.
- If checking battery drain, insert the battery pill in the sound processor and connect it in the red socket.
- Ensure that the sound processor microphones are in the center of the cross
- Launch the Affinity2.0 software.
- When Affinity2.0 software is open, select the HIT tab.
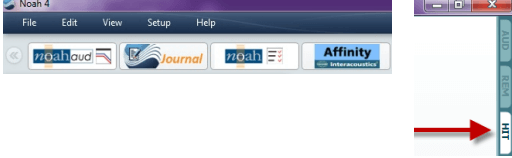
- Choose a test protocol from the drop down menu.
- Click START to begin the test.
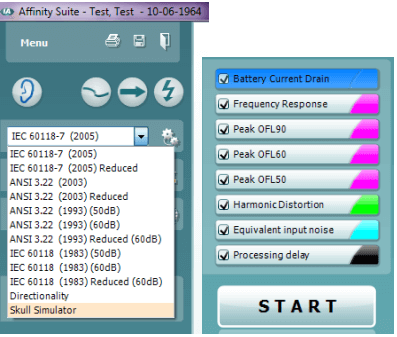
NOTE: The Affinity2.0 has a default Skull Simulator protocol, which takes element from the ANSI standard for Hearing Instruments. This protocol can easily be edited or modified in the setup menu of the HIT module. It is also possible to create your own protocol.
Skull simulator setup guide in the Affinity
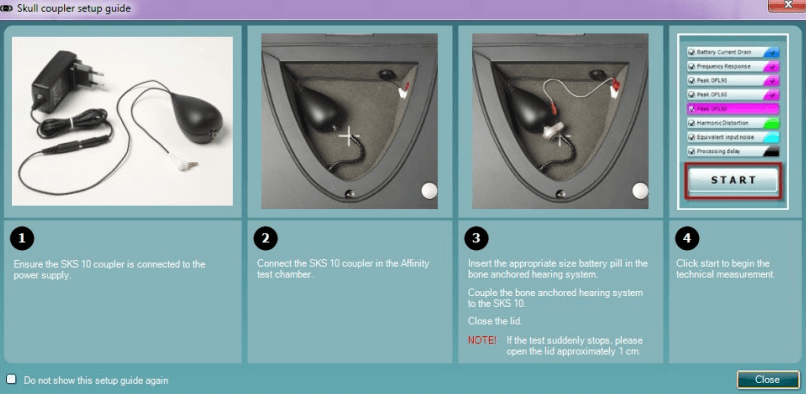
- The setup guide window will appear as soon as the skull simulator protocol is chosen. To deactivate it, insert checkmark in the “Do not show this setup guide again” box.
- To re-initiate the Skull Coupler Setup Guide startup window, go to Menu/Setup/General Setup and insert checkmark in the “Show setup guide” box.
For further information on the SKS10 and creating or customising protocols, please refer to the Interacoustics Additional Information document.

For further information on how to setup the bone anchored device, please refer to the respective bone anchored hearing device manufacturers’ product information documents.
