
Binaural Real Ear Measurements
The purpose of this article is to provide a quick guide for the Binaural REM feature found in the REM440 Real-Ear Measurement module in the Affinity Suite. This quick guide will focus on the method and order of performing measurements using this function.
- Enter/Select an audiogram from Noah or from the AUD module. If no audiogram is entered or selected, no targets will be displayed.
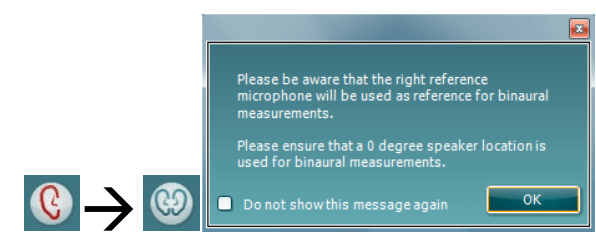
- To enable Binaural REM measurements in the REM module you will need to Right click on the ear selector icon. This will then show a binaural icon and a popup to alert the user when using this function.
Due to the way in which this feature has been implemented you will not need to recreate new protocols to use this function. It uses the settings you already have in your existing protocols.
Please note: when running measurements of this type you will only be using one reference microphone to monitor the signal from the speaker. This is the right microphone by default but it can be swapped to the left microphone by using the ‘use opposite reference microphone’ button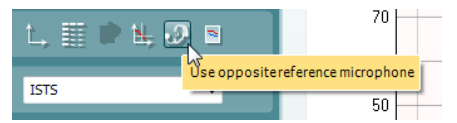
It is also essential that the position of the patient in relation to the REM speaker is maintained at 0° as this will ensure that the same signal intensity is reaching each ear as they are equal distance from the speaker. - Connect probe tubes to the REM reference microphones.
- Click on the Tube Calibration button
 and follow the instructions on the screen, this process ensures that the probe tube is made acoustically invisible – enabling an effective display of the actual gain achieved at the tympanic membrane by the hearing aid.
On running the calibration you will notice that in Binaural mode there is an automated procedure to calibrate both Left and Right REM tubes sequentially, without having to manually start each individually.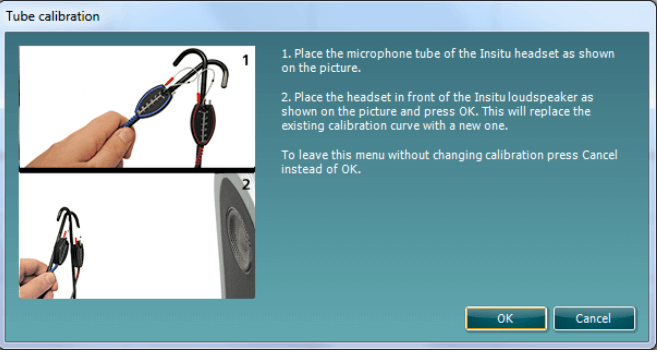
- Position the patient approximately 0.5 metres from the REM loudspeaker.
- Perform otoscopy to ensure the ear canal is clear.
- Snap the REM headsets on the REM headband and place on patient’s ear.
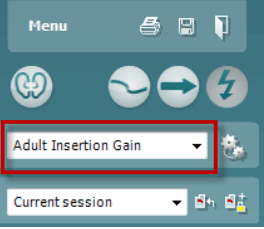
- Choose a relevant protocol to perform your verification; in this example the default ‘Adult Insertion Gain’ protocol has been used.
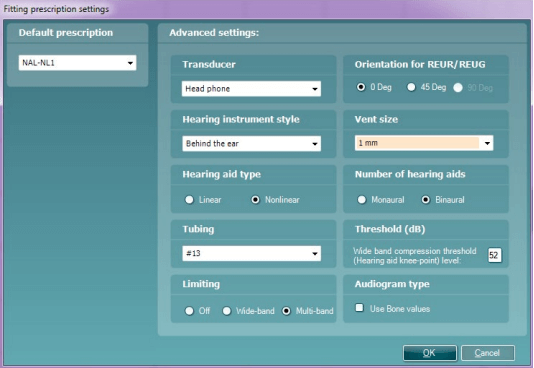
Note: For this example, an Insertion Gain method has been used to demonstrate the Binaural REM feature, however the feature is also compatible with protocols which perform this measurement in an Aided Response method. - Once you have chosen your protocol please configure your fitting prescription settings as per your fitting.
- Place the REM tubes inside the patient’s ears and aim to use a marker of roughly 27mm on the probe tubes. This helps to get the open end of the tube in an optimum recording position (BSA, 2007).
- Begin by running the REUR measurement, this is looking at the natural acoustics of your patients ear canals, it is performed with nothing in the patients ear canals apart from the probe tubes. Your response should peak around 2-3 kHz for a normal adult response (BSA, 2007). The shape of this measurement can also be used as a quality criteria for your probe placement, the measurement should intersect the Horizontal axis (x-axis) at 6khz and must not be more negative than -5dB (BSA, 2007 & ISO, 2003).
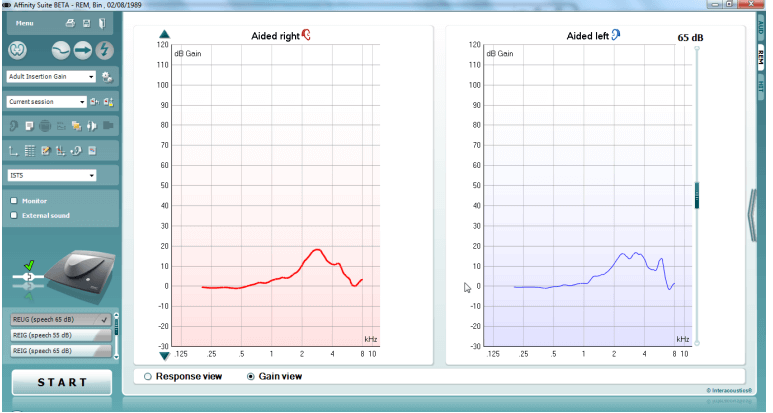
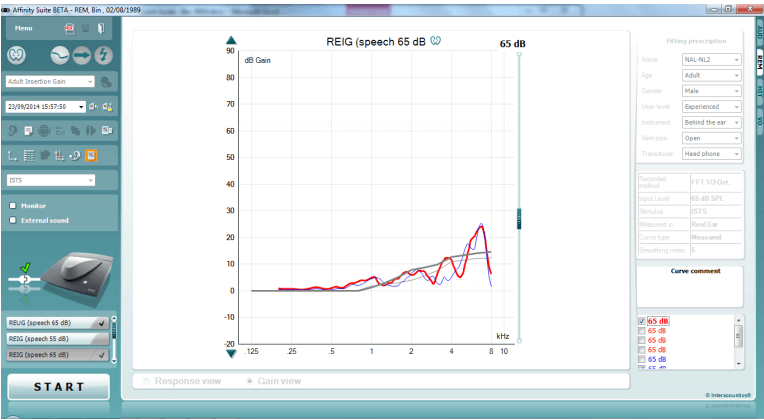
- You can now proceed to running the REIG measurements, there are 3 different intensity measurements in this protocol but the main focus should be to fit the 65dB curve as this is the intensity for speech. Please place the hearing devices into your patient’s ears along with the probe tubes for the following measurements.
You will notice that there is a target in these measurements; in the next step it is shown how you can amend the output of the patient’s hearing devices to meet these targets.
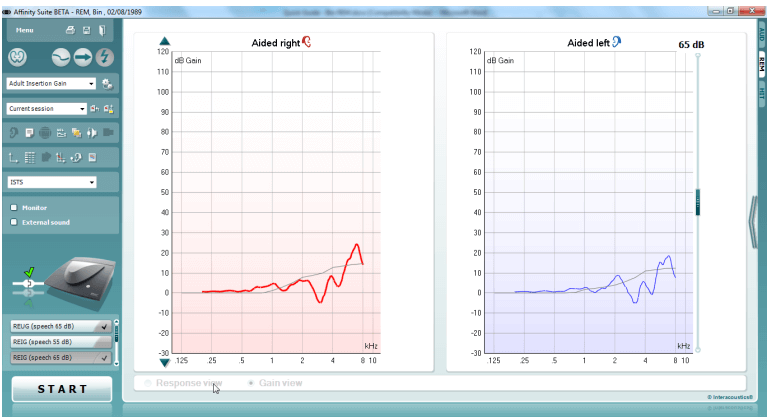
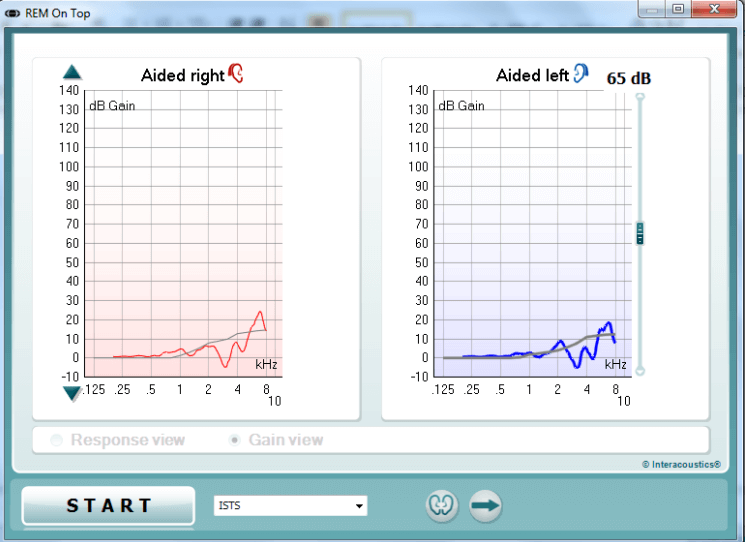
Note: the default view for the Binaural REM feature is to have the left and right aided measure displayed side-by-side. However this can be swapped to an on-top comparison by pressing the button shown below, there is an example of this view below.
Note: Percentile analysis can also be performed in Binaural REM, you just need to enable this setting within your Aided Response measurements protocol. Once enabled, the test screen will show you the percentile range for your output, as shown below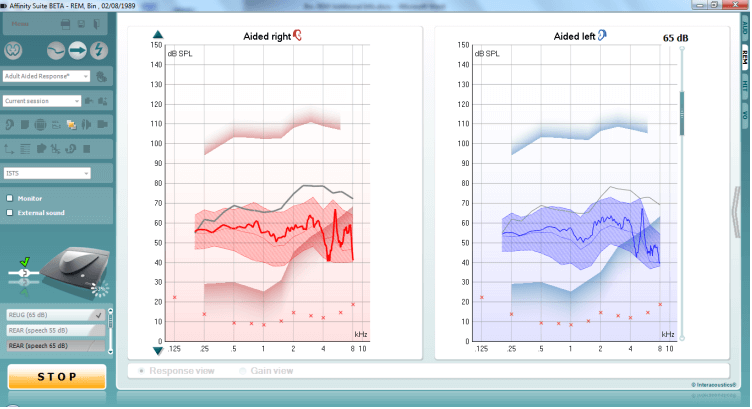
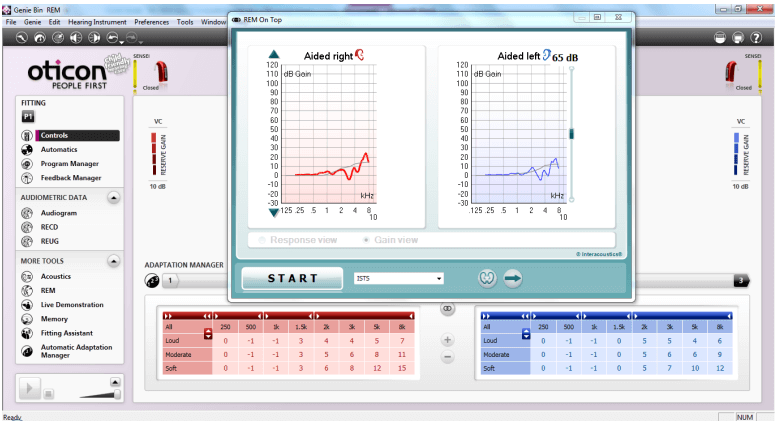
- You will now begin fine tuning in the hearing aid fitting software to amend the output of the device to meet the prescription target.
- A nice feature in the Affinity2.0 Suite is the On-top-mode. This feature allows you to minimize the suite so that it can be placed on top of the fitting software to make it easier to fine tune and compare the output following your changes. This feature can be used on pressing the following button on the left of the Suite GUI

- Once you have fine-tuned your hearing devices so that the patient is happy and have counselled them involving their opinions in the amplification of their hearing devices you can save and close the Suite and finish the session. This is done by pressing the ‘Save and Exit’ button

Note: Binaural REM can also be used when fitting Open Fit type hearing aids. All this requires is for the ‘Open Fit Calibration’ to be run following the REUR measurement for the signal(s) you wish to use for the following measurements.
Note: Binaural REM can only be used with stimuli which do not require active referencing during the measurement. Therefore Binaural REM is not suitable for measurement with Warble Tone, Pink Noise, Random Noise, Pure tone and Narrowband Noise.
Presenter
Interacoustics