
Virtualis troubleshooting for clinicians
This quick guide provides solutions to common issues you may encounter with your Virtualis system. If problems persist after trying the troubleshooting steps, please reach out to your tech support representative for further assistance.
Hardware troubleshooting
Click the links below to jump to your point of interest.
VR headset
Below, we’ll cover troubleshooting for the following:
- Headset not detected
- Blurry image
- Image not centered
- Menu appearing in the VR headset
Headset not detected
First, make sure the link box is ON (Figure 1). Then unplug all connections from the link box, reconnect them, and reset the headset in SteamVR (Figure 2).
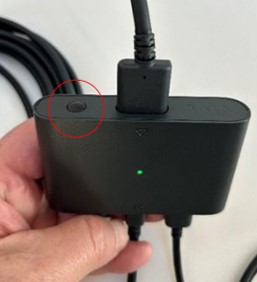
Figure 1

Figure 2
Blurry image
Reason: poor fit of VR headset. Solution: instruct your patient to move the VR headset up and down on their face until they find a clear vision. Then tighten the headset dial and adjust the headset strap.
Image not centered
Reason: VR headset is not calibrated correctly. Solution: while in a module, instruct your patient to look straight. Then press the ‘C’ button on the keyboard.
Menu appearing in the VR headset
Reason: button pressed on the side of the VR headset (Figure 3).
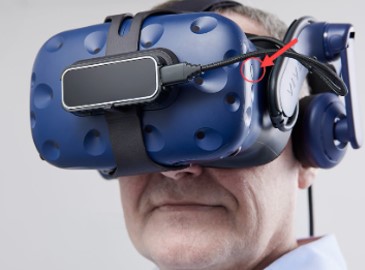
Figure 3
Solution: close the menu by looking away from the menu. Then press the button again. To disable this function, open SteamVR and go to Settings > Dashboard. All settings must be set to ‘Off’.
Base stations
You might encounter an issue where the base station is not detected. See the following steps to solve this issue.
1. Tip
Virtualis can run with only 1 base station.
2. Connection
Make sure power is connected (green light on base station) and protection plastic is removed.
3. Position
Ensure the base station is correctly positioned and has a clear line of sight (Figure 4).
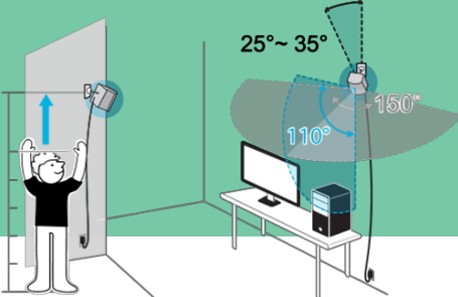
Figure 4
4. Configuration
Run automatic channel configuration (Figure 5).
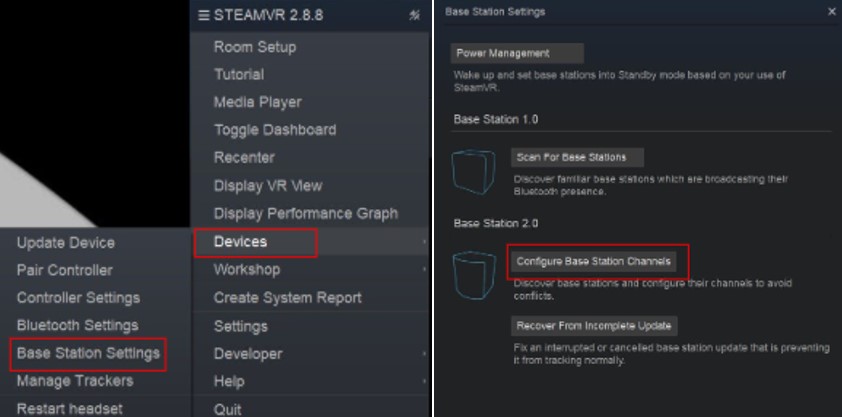
Figure 5
Controllers and trackers
Below, we’ll cover troubleshooting for the following:
- Hand controller or tracker not detected
- Xbox controller not detected
- Leap motion not detected
Hand controller or tracker not detected
Ensure the controller or tracker is turned on and fully charged. Pair the controller or tracker again through SteamVR. To do this, right-click on the controller or tracker icon (Figure 6), click ‘pair controller’, and follow the prompts.
Figure 6
If you do not see the icon, pair through the SteamVR menu and follow the prompts (Figure 7).
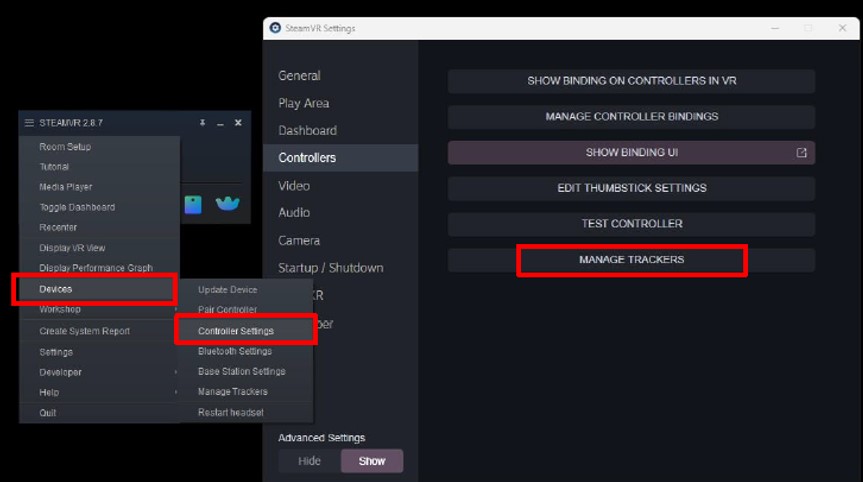
Figure 7
Xbox controller not detected
Ensure the controller is turned ON (Figure 8).
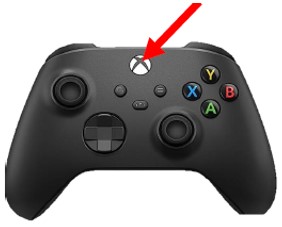
Figure 8
Replace or recharge the batteries if the controller doesn’t start. Also ensure the controller is paired correctly. Press and hold the pair button (Figure 9).
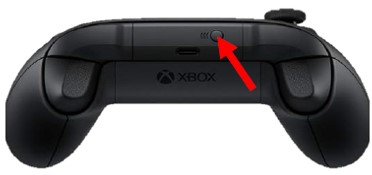
The Xbox button on the controller will blink rapidly. Then the light will turn solid when paired. If the light does not turn solid, try connecting it on your PC:
- Start button > Settings > Bluetooth & Devices.
- Press ‘Add device’.
- Select ‘Everything else’.
Leap motion not detected
Ensure the USB cable is securely connected to the VR headset (Figure 10).

Figure 10
Clean the device’s sensors with a soft cloth. Restart Leap the Motion software in Windows (Figure 11).

Figure 11
StaticVR or MotionVR force plates
Below, we’ll cover troubleshooting for the following:
- Force plates not detected
- Inaccurate weight display
Force plates not detected
First, check the USB/HUB connection. Then run an automatic hardware detection in the Virtualis application (Administration > Devices).
Inaccurate weight display
Solution: tare force plates. Make sure your patient is not standing on the force plates. Then open any StaticVR or MotionVR module and press ‘tare’ (Figure 12).

Software troubleshooting
Click the links below to jump to your point of interest.
SteamVR
Below, we’ll cover troubleshooting for the following:
- Lagging image / tracking issues
- SteamVR errors
Lagging image / tracking issues
Check the frame rate by pressing the ‘F’ key on the keyboard. This should be at least 90 fps. If not, restart the computer. Alternatively, check the base station setup or perform a room setup in SteamVR (Figure 13).
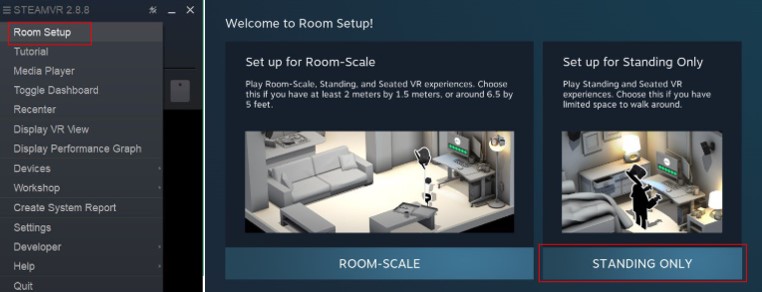
Figure 13
SteamVR errors
When it comes to SteamVR errors, you have several options. We suggest the following order:
- Ensure all cables are properly connected to the link box and restart SteamVR.
- Restart the VR headset by pressing the button on the link box twice.
- Restart the PC.
- Update Windows®.
Updates
Below, we’ll cover how to update for the following:
- Virtualis application
- Windows®
- SteamVR
Virtualis application
If your system is not connected to Wi-Fi, you will need to manually perform updates. Contact your local sales representative for assistance. If you are connected to the internet, then you will be automatically prompted to complete updates.
Windows®
To check for updates manually, select the Start button > Settings > Update & Security > Windows Update > Check for updates.
SteamVR
To check for updates manually, select ‘Check for Steam Client Updates’ under the Steam tab (Figure 14).

Figure 14
Presenter
