
Real-Ear-to-Coupler Difference
What is the real ear to coupler difference (RECD)?
The Real Ear to Coupler Difference (RECD) is a measurement that accounts for the decibel difference across frequencies between SPL measured in the coupler and the SPL measure in the real ear, produced by the same transducer generating the same signal. This ensures that information about the patient’s occluded ear canal characteristics is obtained.
Due to the physically smaller size of the ear canals for infants and children compared to adults, and because it would be very difficult to do real-ear verification on them, the RECD is an important measurement in the pediatric hearing aid fitting process. It enables clinicians to verify the frequency/gain characteristics of the child’s hearing aid while it is attached to the 2cc BTE coupler, without the need to have the child’s ear physically present. Since children have physically smaller ears than adults, and smaller ears equals higher SPL, not taking the RECD into account would likely lead to over-amplification. For more information on RECD and the recommended guidelines for pediatric hearing aid fittings, please refer to the references at the end of this document.
How to measure the the RECD
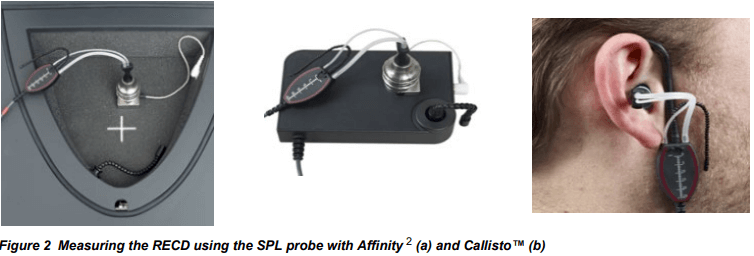
There are two ways of measuring the RECD: with the patient’s ear mould or with the SPL60 RECD probe tip. Measuring with ear moulds will be a bit more precise than measuring with the SPL probe, however; in situations where a quick measurement is needed, using the SPL probe will be much quicker than measuring with the ear mould. In situations where no measurement can be obtained, it is recommended to use age appropriate, predicted RECD values. Instructions for all three methods are detailed below.
1. RECD measurement with earmold
Items required:
- The Callisto™ with Coupler Base
- The REM440 software
- An REM headset/reference microphones
- A probe tube
- An ear mould
- An RECD tube found in the SPL60 Probe tip set, which will be connected the ear mould tube via a tube nipple
- 2 cc coupler connected to an adaptor for the BTE

- Launch the Callisto™ software from your patient management system, Noah or OtoAccess®and click on the REM440 tab
- From the Protocols and Sessions drop down list, choose a protocol that includes the RECD (ex: Pediatric Aided Response)
- Connect the thicker RECD probe tube to the larger metal spout on the REM headset and connect the regular probe tube to the smaller metal spout
- Calibrate the probe tube by clicking the calibrate icon and selecting “Regular Probe”
- Connect a tube nipple to the other end of the RECD probe tube
- Connect the tube nipple to the BTE tubing attached to the 2cc BTE Adaptor
- Click on the RECD test and click start to measure the coupler portion of the RECD measurement
- Once the coupler measurement is done, the software will prompt to measure the ear portion of the RECD. Disconnect the tube nipple from the RECD probe tube and connected to the ear mould tubing
- Proceed with otoscopy, ensuring the ear canal is clear. Place the probe tube inside the patient’s ear and position the ear mould, connected to the RECD probe via tube nipple, in the ear canal
- Continue with the ear portion of the RECD. The two measurements will be on the screen and the difference will be calculated automatically
- The RECD can now be used for the hearing aid fitting. The RECD can be imported, if that feature is supported, manually into the hearing aid software. The fitting will be recalculated while taking the RECD into account1. To view the RECD values, click on Table View
- To proceed with the hearing aid verification, click on the REAR button; the software will automatically go into the coupler mode and it will then be possible to proceed with the verification. The default fitting formula will be DSL v5 Pediatrics. Use the hearing aid software to fine tune the hearing aid and to ensure that the output is matching the DSL targets for soft, average, and loud, using a speech stimuli (like the ISTS). Measure the MPO to ensure that the output for loud sounds is not hitting the UCL.
2. RECD measurement with SPL60 probe
Needed items:
- The Callisto™ with Coupler Base
- The REM440 software
- An REM headset/reference microphones
- A probe tube
- The SPL60 probe tip
- Impedance probe tips
- 2 cc coupler connected to an adaptor for the BTE
- Launch the Callisto™ software from your patient management system, Noah or OtoAccess®and click on the REM440 tab
- From the Protocols and Sessions drop down list, choose a protocol that includes the RECD (ex: Pediatric Aided Response)
- Click on RECD. Right click and select “Settings. A window will pop up and ensure the checkbox “use In Situ SPL probe” is ticked off. This will tell the software that the SPL60 probe is being used rather than the ear mould
(If always using the SPL probe rather than ear moulds, it is possible to create a protocol to ensure that the “Use the insitu SPL probe” option is always ticked off. For information on how to create protocols, please refer to the Instructions for Use or Additional Info manuals for Callisto™. ) - Connect the SPL60 Probe tip to the REM headset; thicker tube to the larger metal spout, regular probe tube to the thinner metal spout
- Calibrate the SPL60 probe by clicking the calibrate icon and selecting “SPL Probe”
- Connect the RECD adaptor to the 2cc coupler and attach to the coupler microphone
- Click on the RECD test and click start to measure the coupler portion of the RECD measurement
- Once the coupler measurement is done, the software will prompt to measure the ear portion of the RECD. Remove the probe tip from the coupler.
- Proceed with otoscopy, ensuring the ear canal is clear. Select an appropriately-sized probe tip and place it in the patient’s ear
- Continue with the ear portion of the RECD. The two measurements will be on the screen and the difference will be calculated automatically
3. Using age appropriate predicted RECD values

If it is impossible to get an RECD measurement (ex: child is crying or uncooperative), it is recommended to use age appropriate predicted RECDs.
- Launch the Callisto™ software from your patient management system, Noah or OtoAccess®and click on the REM440 tab
- From the Protocols and Sessions drop down list, choose a protocol that includes the RECD (ex: Pediatric Aided Response)
- Select RECD
- Right click on the RECD and select “Show Predicted Curve”. A window will pop up, asking to choose the age and to choose the type of prediction: “ear mould” or “tip”

Own mould versus SPL probe
Whether the RECD is performed using the client’s own ear mould or the SPL probe may have an effect on the result. The benefit of using the client’s own ear mould is that the measurement will reflect your client’s actual residual volume whereas the SPL probe only provides an estimate. However, you may be in a situation where the ear mould is nonexistent, broken, or has an extremely bad fit. Furthermore, you might need to conduct measurements on children not willing to co-operate. In these situations the SPL probe offers the benefit of easy probe placement and measurement.
Below, see two RECD measured in the same ear using the SPL probe and own ear mould respectively. Note: the differences between the two ways of measuring. As can be seen above the curve measured with the client’s own ear mould is below 0 in the low frequencies. This may be due to ear mould effects such as the tightness of the fit and venting and in the insertion depth of the SPL probe or ear mould.

Using the RECD in the hearing aid fitting
The RECD can now be used for the hearing aid fitting. The RECD can be imported, if that feature is supported, manually into the hearing aid software. The fitting will be recalculated while taking the RECD into account ( Not all hearing aid manufacturers’ software support the import of RECDs. If unsure, check with the hearing aid manufacturer.). To view the RECD values, click on Table View.
To proceed with the hearing aid verification, click on the REAR button; the software will automatically go into the coupler mode and it will then be possible to proceed with the verification. The default fitting formula will be DSL v5 Pediatrics. Use the hearing aid software to fine tune the hearing aid and to ensure that the output is matching the DSL targets for soft, average, and loud, using a speech stimuli (like the ISTS). Measure the MPO to ensure that the output for loud sounds is not hitting the UCL.
Visible Speech Mapping can also be used for coupler based fittings. This can be done by choosing the Visible Speech Mapping in the REM module, rather than the REM440 module itself. Note that Visible Speech Mapping requires a separate license.
References
Bagatto MP. Optimizing your RECD measurements.The Hearing Journal 2001; 54: 32, 34-36.
Bagatto MP. The Essentials of Fitting Hearing Aids to Babies. Seminars in Hearing 2013; 34:1, 19-26.
Bagatto MP (2007). Learning the Art to Apply the Science: Common Questions Related to Pediatric Hearing Instrument Fitting.
McCreery, Ryan. RECD is a Reasonable Alternative to Real-Ear Verification. The Hearing Journal 2013; 66:7, 13-14.
Munro, Kevin. Integrating the RECD into the Hearing Instrument Fitting Process.
Purdy, J and Sheila, T. (2008). Measuring RECD on a Young Child.