
How to perform FM transparency verification
Note: FM transparency assumes that the hearing aid has already been programmed to match the target, according to the patient’s hearing loss.
Note: The examples shown below are using the Affinity Compact system. However, the steps are the same.
Launch Affinity/Callisto Suite and select the REM module. Select the FM Transparency protocol from the drop-down menu (Figure 1).
Figure 1: FM Transparency protocol.
When the protocol has been selected, a setup guide will pop up with instructions on how to perform FM transparency verification (Figure 2). See below steps for further instructions.
Figure 2: FM Transparency setup guide. Note: this setup guide shows a different FM transmitter.
Step 1: Hearing aid alone (65 dB)
1. Select the ‘HA Alone’ test.
2. Attach the hearing aid to the coupler/coupler microphone.
3. Position the hearing aid in the test chamber (Figure 3).
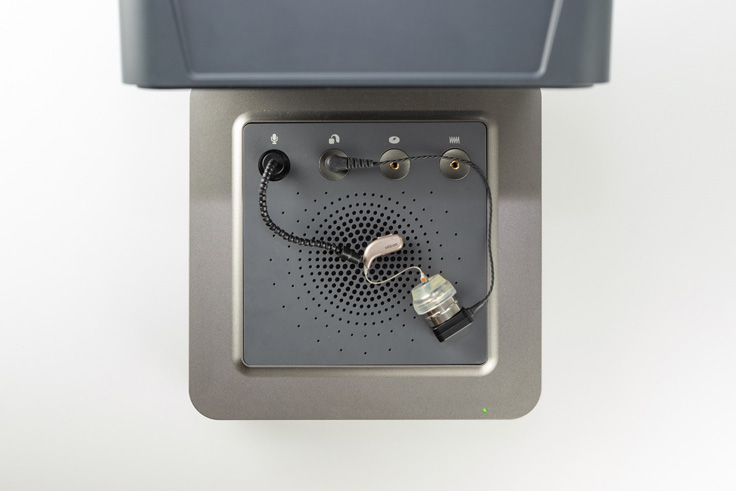
Figure 3: Hearing aid placed in test chamber.
4. Click ‘START’ to measure the output of the hearing aid (Figure 4).
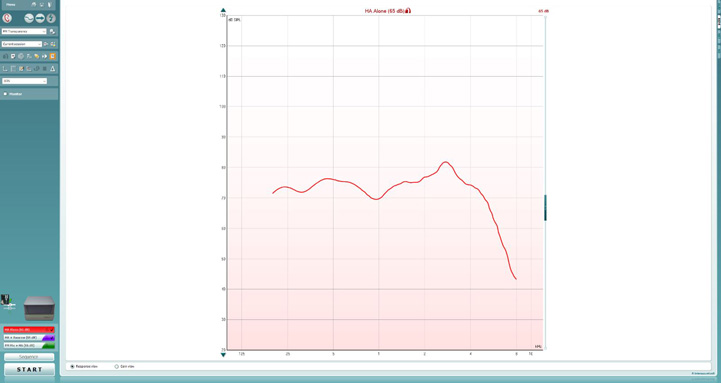
Figure 4: HA Alone measurement.
Step 2: Hearing aid and receiver (65 dB)
1. Leaving the hearing aid attached to the coupler, attach the FM receiver to the hearing aid OR connect the FM transmitter to the hearing aid with Bluetooth (depends on the type of FM transmitter) (Figure 5).
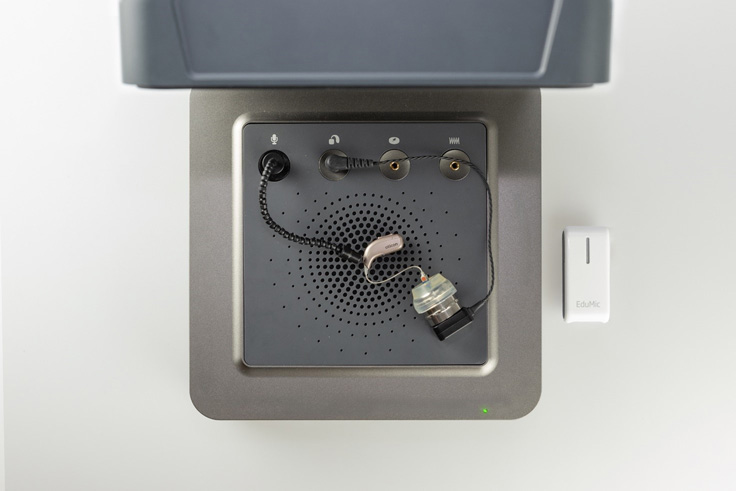
Figure 5: Setup for hearing aid and receiver measurement.
2. Make sure the FM transmitter is turned on but muted.
3. Click ‘START’ to measure the output of the hearing aid (Figure 6).
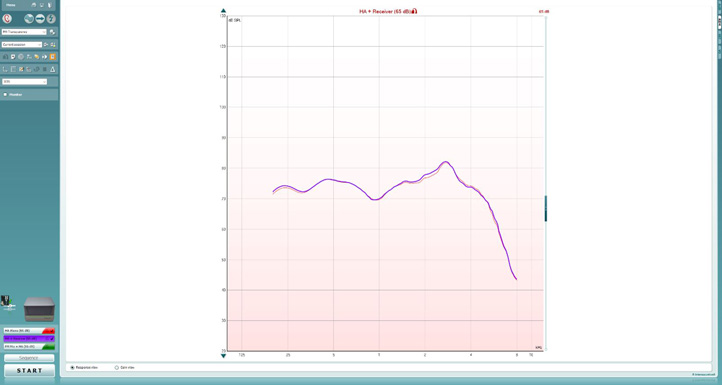
Figure 6: Hearing aid and receiver measurement. Note: The two curves should be very similar to each other at this step.
Step 3: FM microphone and the hearing aid
1. Place the hearing aids, still attached to the coupler microphone, outside of the test box.
2. Unmute the FM transmitter.
3. Position the FM transmitter inside the test box, facing down on the integrated speaker.
4. Place the reference microphone at the top of the FM transmitter. See Figure 7.
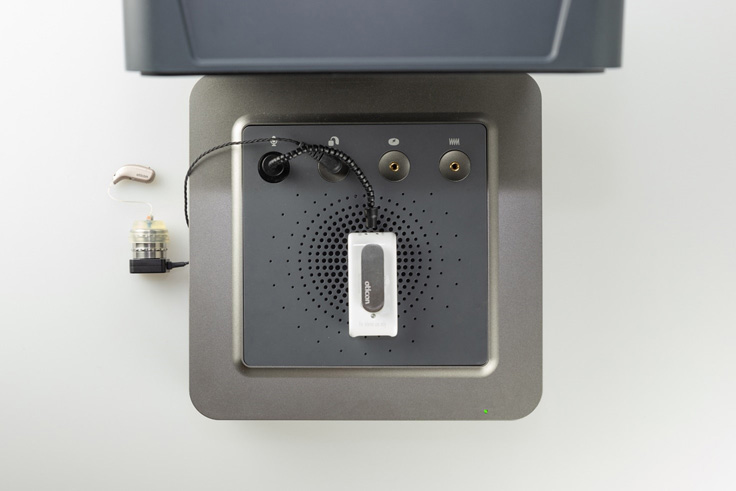
Figure 7: Setup for FM microphone and hearing aid measurement.
5. Click ‘START’ to measure the output of the hearing aid when input is from the FM microphone (Figure 8).
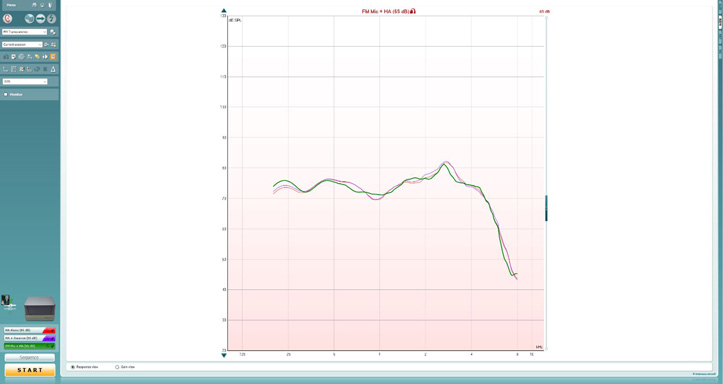
If you already now notice a significant difference between the curve from step 2 and the curve from step 3, you can presume that there is a problem with the FM microphone and that there is not transparency. Ensure that the test is conducted in a quiet environment, since the hearing aid is outside of the test box and the hearing aid microphones are still active.
Step 4: Calculate the average difference
1. Click on the table mode icon (Figure 9) to activate table mode (Figure 10).
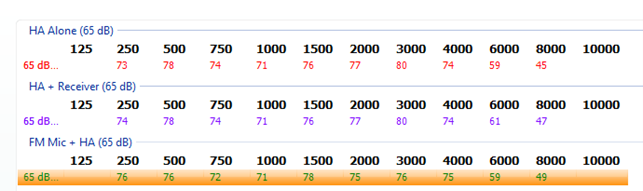
Figure 10: Table mode.
2. Once in table mode, calculate a 3-frequency average of the differences between the hearing aid response in step 2 and the FM transmitter response in step 3 for the following frequencies: 750 Hz, 1000 Hz, and 2000 Hz (Figure 11). See example below.
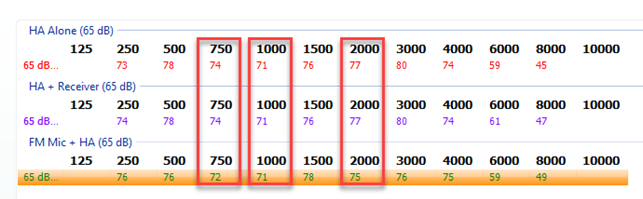
Figure 11: Calculating a 3-frequency average.
If the average is 2 dB or less, FM transparency is achieved. If the average is more than 2 dB, adjust the FM.
Example of calculating the transparency
Using the numbers from Figure 11, let’s calculate the transparency (Table 1).
| Hearing aid + receiver | FM mic + hearing aid | Difference | |
| 750 Hz | 74 | 72 | 2 |
| 1000 Hz | 71 | 71 | 0 |
| 2000 Hz | 77 | 75 | 2 |
| Average | 1,3* |
Table 1: Example of calculating the transparency.
*Average difference is less than 2 dB. Therefore, transparency has been achieved.