How to perform the ACT™ test with Affinity Compact (step-by-step)

14 December 2023
10 mins
Reading

In this quick guide, you will learn how to perform the Audible Contrast Threshold (ACT) test in the Affinity Compact software.


What is the ACT test?

The ACT test is an above-threshold, non-language specific test that quantifies a person’s real‑world ability to hear in noise. The test applies the shape and levels of the audiogram to ensure the correct stimulus intensity is applied.


Pre-test counseling guidance

You can perform ACT on any adult client that you deem suitable to perform pure tone audiometry. It may be useful to counsel the client on the reason for performing ACT. Here, you will find an example script.

We will perform a test called ACT. The result from this test will clarify your abilities to hear in background noise. This can be challenging, particularly if you have a hearing loss. So, performing this test will help me to know to what degree this is also a challenge for you.


Required equipment

To perform an ACT test, you will need:

  • Affinity Compact
  • Patient response button
  • Connected PC and keyboard
  • Headphones or insert earphones
  • Licensed AC440 audiometry module including an ACT license


Points to note

It is a good idea to listen to the acoustic stimuli over monitor headphones during the test. This will help you to present the target stimuli in an unpredictable manner.

To perform ACT, you must complete an audiogram for air conduction at the following frequencies:

  • 250 Hz, 500 Hz, 1000 Hz, 2000 Hz, 4000 Hz.
  • Inter-octave frequencies will be considered in ACT testing if you have completed them.

Should the following notification appear: ‘Insufficient data to complete the test’, please ensure you have stored all mandatory thresholds for both ears. A ‘no response’ will be factored into the ACT test, but a ‘Could not test’ or ‘Did not test’ will be excluded and you will not be able to complete the ACT test.


ACT test procedure

1. Launch your Affinity Suite into AUD mode.

2. Ensure there is an audiogram inserted into the current session.

3. Click on ‘Menu’.

4. Click on ‘Test’.

5. Select ACT.

6. The instructions will pop up in a separate window (Figure 1). Read the instructions to the client. Use the ‘sound examples’ to demonstrate and explain the test procedure. You can play these sound examples as many times as is necessary to familiarize the client.


The instructions read as follows: I will now perform a test called ACT. This will determine how well you can hear in noisy situations. The test takes two to three minutes. You will hear episodes of noise. The noise will occasionally be combined with a siren sound. You will need to press the button only when you hear the siren sound. The siren will gradually get fainter, but no matter how faint or loud it is, please still press for the siren sound. Now I will present examples of what you will hear. Note for clinician: Ensure transducers are on patient at this point and give the patient the response button. This is the noise. Present noise example. This is the siren. Present siren example. This is the noise combined with the siren. Press when you hear the siren. Present siren and noise example. Now let’s proceed with the test.
Figure 1: ACT instructions.


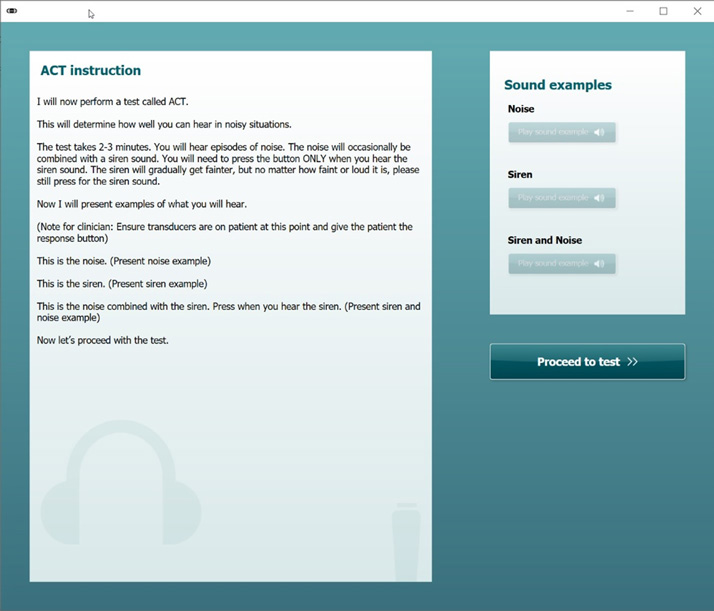
7. Once you are confident that the client has understood the test, click ‘Proceed to test’.

If you wish to read instructions again at any point, click on ‘i’ in the left-hand menu (Figure 2).


Percent symbol labeled with the action to toggle graphs. ‘i’ symbol labeled with the action to show instruction screen.
Figure 2: Access to instruction screen.


8. Press START.

A sequence of noise episodes will start.

You perform the test in the same way as pure tone audiometry using the Hughson‑Westlake adaptive method (2 down, 1 up) with a 3 out of 5 criterion (Appendix 1).

Present the stimulus by clicking once on your chosen presentation key. If you press ‘spacebar’ to present a stimulus, press this once. Do not press and hold.

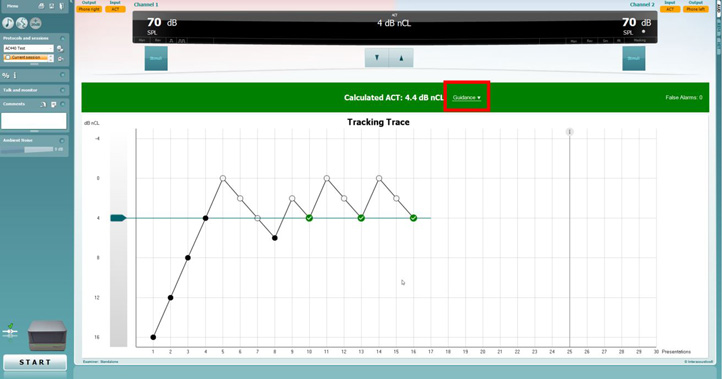
A black dot appears automatically when the client correctly hears the target stimulus. A white dot appears automatically when the client has not heard the stimulus or has not responded in the viable time frame (Figure 3).


ACT test screen in the software. The patient has a calculated ACT value of 3 point 9 dB nCL. The graph has dB nCL as a function of presentations. The presentations at 16, 12, 8, and 4 dB nCL were all heard on the first try. Following, the patient was unable to hear the presentations at 0 and 2 dB nCL. The patient then hears the stimulus correctly at 4 dB nCL. This process repeats itself two times, leaving the patient with an ACT threshold value of 3 point 9 dB nCL.
Figure 3: Example trace.


Optional: If you are not confident that your client knows when to respond after presenting the sound examples within the instruction box, try starting the test and perform 3 presentations at 16 dB nCL. Then continue as in step 8.

9. Once you have reached the required number of thresholds to produce an ACT value, the test will automatically stop. The calculated ACT value is then stored in the middle of the green band across the screen.

Points to consider:

  • You can stop the test at any point by pressing the ‘STOP’ button.
  • You should consider false alarms. There is no set limit for false alarms, and you should assess the trace and the patient feedback to make an informed decision when accepting the ACT value.
  • If the test exceeds 25 presentations (indicated as a line on the trace), there is a higher risk of client fatigue. Please refer to scenario 3 below for guidance on how to address this.


Guidance on what to do in case of inconsistent responses during the test

Every client is different and may not follow normative patterns when conducting ACT. Below are some examples on what you can do based on irregular responses.


Scenario 1: Client keeps pressing response button despite no stimulus

The client has many false positives (responds at the right time but has not heard the signal) or presses the button too often. Keep note of the false‑alarms indication on the right‑hand side of the screen. To solve this, increase the nCL to 4 dB nCL above the expected threshold (or even higher) to remind the client what to listen for and return to the previous level (Figure 4).


ACT test screen in the software. The patient has a calculated ACT value of 2 point 9 dB nCL. The graph has dB nCL as a function of presentations. The presentations at 16, 12, 8, and 4 dB nCL were all heard on the first try. Following, the patient was unable to hear the presentations at 0 and 2 dB nCL. The patient then hears the stimulus correctly at 4 dB nCL. The patient is again unable to hear the stimulus at 0 dB nCL, but then goes on to press the response button at 2 dB nCL and minus 2 dB nCL. Suspecting a false positive, the clinician in this case then presents a stimulus at 8 dB nCL, 4 dB nCL above the expected threshold of 4 dB nCL. Following, the patient follows the expected threshold, unable to hear stimuli that are less than 4 dB nCL.
Figure 4: Scenario 1.


Scenario 2: Client is losing concentration

The client is close to obtaining a threshold but loses concentration and fails to respond at levels detected before. To solve this, increase the nCL to a detectable level (e.g. 16 dB nCL) to remind the client what to listen for (Figure 5).


ACT test screen in the software. The patient has a calculated ACT value of 1 point 3 dB nCL. The graph has dB nCL as a function of presentations. The presentations at 16, 12, 8, 4, and 0 dB nCL were all heard on the first try. Following, the patient was unable to hear the presentations at minus 4 and minus 2 dB nCL. The patient then hears the stimulus correctly at 0 dB nCL. The patient then goes on to not press the response button all the way up to 4 dB nCL. Suspecting the patient has lost their concentration, the clinician in this case then presents a stimulus at 16 dB nCL. Following, the patient follows the expected threshold, unable to hear stimuli that are less than 0 dB nCL.
Figure 5: Scenario 2.


Scenario 3: The run exceeds 25 presentations

The run reaches 25 presentations and there is no threshold in sight (Figure 6). There is a higher risk of client fatigue at this point. To solve this, give the client a break, and re‑iterate the instructions if needed. You can also perform ACT in a separate appointment, as long as the client’s audiogram is present.


ACT test screen in the software. The patient has no calculated ACT value due to more data needed. The graph has dB nCL as a function of presentations. The patient’s expected threshold seems to be about 2 dB nCL, but the three out five criterion hasn’t been met yet after 25 stimulus presentations.
Figure 6: Scenario 3.


Scenario 4: Client responds unexpectedly

An otherwise reliable client responds against your expectation. To solve this, present the stimulus again at the same dB nCL to make sure the first response was not a coincidence (Figure 7).


ACT test screen in the software. The patient has a calculated ACT value of 0 point 9 dB nCL. The graph has dB nCL as a function of presentations. The presentations at 16, 12, 8, and 4 dB nCL were all heard on the first try. Following, the patient scores correctly at 2 dB nCL two times, having been unable to hear below this level. However, the patient then goes on to supposedly hear the stimulus at 0 and minus 2 dB nCL. Suspecting a false response at minus 2 dB nCL, the clinician repeats the stimulus at this level. The patient fails to respond and ultimately scores correctly at 2 dB nCL for a third time.
Figure 7: Scenario 4.


Post-test counseling guidance

To access the post-test counseling guidance, click the ‘Guidance’ drop box in the middle of the screen (Figure 8). This will reveal the ACT severity categories with accompanying fitting advice (Figure 9).


Figure 8: Guidance drop box.


For normal contrast loss, which corresponds to an ACT value between minus 4 to plus 4 dB nCL, the advice reads: Adaptive features set to minimum level – help preserve natural sound in all environments. For mild contrast loss, which corresponds to an ACT value between 4 to 7 dB nCL, the advice reads: Adaptive features set to slightly higher than the minimum level – help preserve natural sound and improve speech understanding in the most noisy environments. For moderate contrast loss, which corresponds to an ACT value between 7 to 10 dB nCL, the advice reads: Adaptive features set slightly lower than the maximum level – help balance speech understanding while maintaining natural sound in moderately noisy environments. For severe contrast loss, which corresponds to an ACT value between 10 to 16 dB nCL, the advice reads: Adaptive features set to maximum level – help prioritize speech understanding in even the least noisy environments. Also consider streaming devices and communication training.
Figure 9: Fitting guidance based on ACT value.


Now that you have obtained your ACT value, you can use this in many ways, such as:

  • Recommend assistive listening devices
  • Set the adaptive features in all hearing aids
  • Focus on rehabilitation and communication strategies
  • Use selected hearing aids to automatically prescribe adaptive features
  • Counsel clients on their prediction of how well they will cope in noisy situations


Appendix 1

Complex flowchart describing how to perform the ACT test. The first step is to present the stimulus at 16 dB nCL. If there is no response, present at 16 dB nCL again. If there is still no response, present at 16 dB nCL again. If there is still no response the third time, abandon the test. If there is a response on either the first, second, or third presentation at 16 dB nCL, decrease by two steps. If there isn’t a response after decreasing by two steps, increase by one step. If there still isn’t a response, increase by one step. If there is a response after the first time increasing by one step, the three out of five criterion determines either the threshold or whether to decrease by two steps. Going back to the initial decrease by two steps. If there is a response after decreasing by two steps, the three out of five criterion determines either the threshold or whether to decrease by two steps.
Note: Under the assumption that the client has understood the test, failing to respond at 16 dB nCL means the client has a very severe contrast loss.

Presenter

Rasna Kaur Mistry, BSc (Hons) Audiology

Popular Academy Training

Interacoustics - hearing and balance diagnosis and rehabilitation
Copyright © Interacoustics A/S. All rights reserved.