
Training in Pure Tone Audiometry (PTA)
Pure Tone Audiometry: An Introduction
Description
Table of contents
- What is pure tone audiometry?
- What is a pure tone audiogram?
- Audiometers that can perform pure tone audiometry
- Testing considerations
- Preparing your patient for pure tone audiometry
- Ascending method of pure tone audiometry
- Bone conduction testing
- Cross hearing and masking
- Results interpretation
What is pure tone audiometry?
Pure tone audiometry is a behavioral hearing test used to detect an individual's hearing threshold levels, allowing hearing care professionals to measure the amount of a hearing loss a patient has. The test works by delivering pure tones at one-octave frequencies between 250 and 8000 Hz via a sound transducer. The level of these pure tones is then reduced to quietest level at which a patient can detect the tone, which is defined as the hearing threshold.
Test transducers include headphones (earphones) and bone vibrators. Headphones deliver pure tones via the air conduction pathway, whereas a bone vibrator delivers sound to the ear via the bone conduction pathway. By measuring both pathways, you can use pure tone audiometry to not only determine the quietest sounds a patient can hear, but also to guide you on the anatomical location of the hearing loss. You do this by looking at the difference between the thresholds measured using air conduction and bone conduction. This is the air-bone gap, which we’ll expand on later during this article.
The results from pure tone audiometry are displayed on a graph called a pure tone audiogram, which historically has been the primary tool used to fit hearing aids. Although this is still the case as of today, it’s important to note that pure tone audiometry only assesses the quantity of hearing and does not assess other components of hearing such as sound localization or speech recognition. Therefore, it’s also important to perform other tests such as the Audible Contrast Threshold (ACT™) test when fitting hearing aids to optimize the performance of these devices.
What is a pure tone audiogram?
A pure tone audiogram is graphical representation of the results from pure tone audiometry displayed in level (dB HL) as a function of frequency (kHz). Figure 1 shows an example of a pure tone audiogram for both ears from the Affinity Compact software.
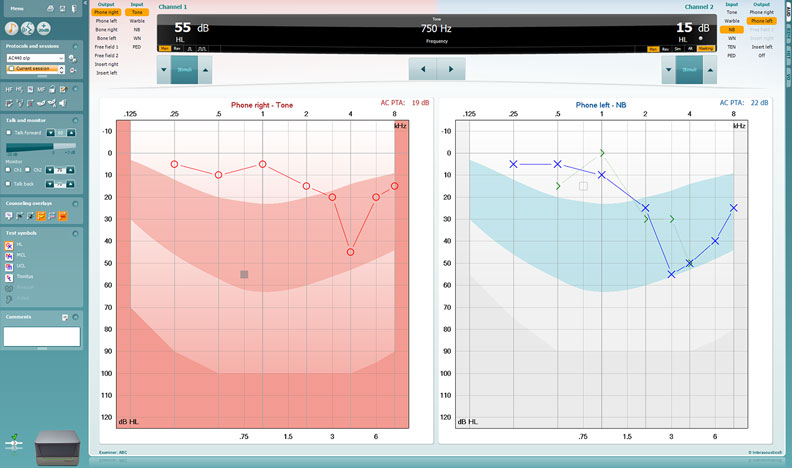
You might have wondered why the right ear is displayed to left and the left ear is displayed to the right. The simple explanation for this is the audiograms are displayed from the clinician’s view. Below, we’ll cover specific elements of an audiogram.
1. Hearing threshold
The hearing threshold at any given frequency is the deviation from 0 dB HL. For example, the patient’s hearing threshold in the right ear at 0.25 kHz is 5 dB HL in Figure 1.
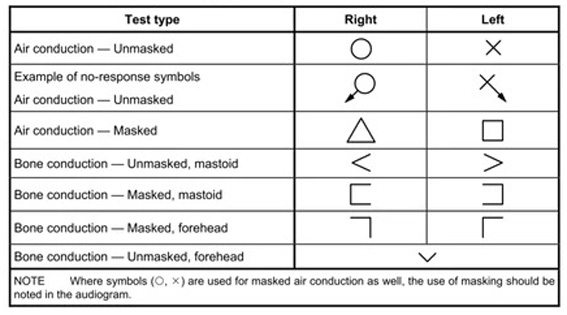
2. Audiogram symbols
Below, you can see the symbols used for air and bone conduction audiometry according to the ISO 8253-1:2010 standard (Figure 2). These are the most common symbols used worldwide. It’s important to note that certain countries use different symbols, so knowing what symbols are used locally is important to properly interpret the pure tone audiogram.
Audiometers that can perform pure tone audiometry
Before we discuss pure tone audiometry in more detail, let’s briefly consider the instrumentation to deliver the pure tone stimuli. As pure tone audiometry is an essential part of the hearing test battery, most audiometers include – or have the option to include – pure tone testing capabilities.
Table 1 outlines which audiometers from Interacoustics can perform pure tone audiometry.
| Audiometer | Type |
| AC40 | Clinical audiometer |
| AD226 | Diagnostic audiometer |
| AD528 | Diagnostic audiometer |
| AD629 | Diagnostic audiometer |
| Affinity Compact | Hearing aid fitting system |
| AS608 | Screening audiometer |
| Callisto™ | Portable audiometer |
| Equinox Evo | Clinical audiometer |
| Luna | Screening audiometer |
Table 1: Audiometers from Interacoustics that can perform pure tone audiometry.
Testing considerations
Before preparing your patient and performing the test, please consider the following to ensure the best possible test results.
1. Ambient noise
To measure correct results, the ambient noise – also referred to as background noise – must be low in your test environment. The ISO 8253-1:2010 standard for audiometric test methods states the maximum permissible levels for testing. These values are transducer dependent. Selected Interacoustics audiometers include an Ambient Noise microphone, so with these devices you can check the amount of noise in your facility in real time.
2. Random physiological noise
Heavy breathing, noise from neck movements, and similar noises can influence your measurements. Your patient should sit still throughout the test to get the best results.
3. Psychological factors
Performing pure tone audiometry requires a certain amount of attention from your patient. Pay attention to your patient and any odd-looking results to detect a momentary lapse of concentration or patient fatigue.
4. Testing method
When it comes to presenting the stimuli, you need to consider the presentation time and interval.
Presentation time
To allow your patient enough time to hear and respond to a tone, you need to present the tone for a period of between 1 and 3 seconds.
Presentation interval
To avoid your patient being able to guess when you present the tone, the interval between presentations should not be the same. Again, changing the period between 1 and 3 seconds will provide enough variability in the test technique.
5. Equipment
It’s important to make sure the pure tones presented are at the correct levels and at the correct frequencies without distortions. It’s therefore essential to make sure your audiometer is calibrated by a trained technician on a yearly basis. Daily listening checks by the tester, otherwise known as stage A checks, are also recommended.
6. Age-related hearing loss
Finally, the age of your patient can also affect your results. The older your patient is, the more hearing loss you can expect to see – especially in the high frequencies.
Preparing your patient for pure tone audiometry
Before testing, there are a few steps you need to take to make sure your patient is ready.
1. Exposure to loud noise
Check that your patient hasn't been exposed to loud noise for extended periods of time in the last day or so before testing.
2. Otoscopy
Perform an otoscopic examination to ensure that ear wax or any other debris isn’t blocking the ear canal.
3. Instructing your patient
Finally, you need to instruct your patient on how to respond and when to respond. Depending on your test setup, the response task could be pressing a patient response button, but it could also be raising an arm.
The BSA (2018) recommends the following instructions: “I am going to test your hearing by measuring the quietest sounds that you can hear. As soon as you hear a sound (tone), press the button. Keep it pressed for as long as you hear the sound (tone), no matter which ear you hear it in. Release the button as soon as you no longer hear the sound (tone). Whatever the sound, and no matter how faint the sound, press the button as soon as you think you hear it, and release it as soon as you think it stops” [1].
4. Initial sequence
Before formally stating the test, it’s best practice to start with an initial familiarization sequence using an air conduction transducer (headphones or earphones). You should present this to the patient’s better ear. If the patient reports symmetrical hearing in both ears, then you can use either ear.
- Present a clearly audible tone at 1 kHz. For example, 40 dB HL for a normal hearing subject.
- Reduce the level of the tone in steps of 20 dB until you have no response from the test subject.
- Increase the level of the tone in steps of 10 dB until you get a response.
- Present the tone again at the same level.
- If your patient responds twice at this level, then you’ve completed the initial sequence.
Ascending method of pure tone audiometry
Now we’re ready to start the test. You should perform the test using the ascending method described in the ISO 8253-1:2010 standard. Other variations to completing the test also exist but the ascending method is by far the most performed technique.
The starting frequency is always 1000 Hz, and you should estimate the starting level from the initial sequence above. The BSA (2018) recommends the following test order:
- 1000 Hz
- 2000 Hz
- 4000 Hz
- 8000 Hz
- 500 Hz
- 250 Hz
The ear side should be the better hearing ear. The BSA (2018) describes the following steps to determine the threshold.
“1. Following a satisfactory positive response, reduce the level of the tone in 10-dB steps until no further response occurs.
2. Increase the level of the tone in 5-dB steps until a response occurs.
3. After the first response using an ascending approach, decrease the level by 10 dB and begin another ascending 5-dB series until the subject responds again.
4. Continue to decrease the level by 10 dB and increase by 5 dB until the subject responds at the same level on two out of two, three or four (i.e. 50 % or more) responses on the ascent. This is the hearing threshold level. Threshold is defined as the lowest level at which responses occur in at least half of a series of ascending trials with a minimum of two responses required at that level.
5. Proceed to the next frequency, starting at a clearly audible level (e.g. 30 dB above the adjacent threshold), and use the 10-dB-down, 5-dB-up sequence described in Step 4 until the threshold criterion is satisfied.”
Bone conduction testing
If you establish a hearing loss via air conduction testing, testing via bone conduction is required to establish the nature of the hearing loss (sensorineural, conductive or mixed). The bone vibrator is normally initially placed over the mastoid prominence of the worse hearing ear (as defined by the air conduction thresholds averaged between 500 Hz and 2000 Hz).
Place it on the mastoid bone as near as possible to the pinna without touching it and without resting on hair. The vibrator is kept firmly in place by using a headband that holds it against the skull with the required static force. Note the side on which you place the vibrator on the audiogram.
The preferred test frequencies and order are similar to those used in air conduction testing. However, it’s typically only necessary to test via bone conduction for those frequencies where a hearing loss is present in air conduction (an exception is if you suspect superior semi-circular canal dehiscence). The standard bone vibrator used in audiometry (RadioEar B71) has increased distortion performance at low frequencies, meaning testing is not recommended at frequencies below 500 Hz. A more modern bone vibrator the B81 has less distortion at these frequencies but the convention is still to only test down to 500 Hz in bone conduction testing.
The requirements for the timing of stimuli presentations, instructions and methods for finding the threshold are the same for bone conduction as those used for air conduction testing.
Cross hearing and masking
When performing pure tone audiometry via air or bone conduction, it’s important to consider the risk of cross hearing. Cross hearing can take place when there is a significant difference (or asymmetry) in the hearing thresholds of the two ears. Interaural attenuation (or transcranial transmission loss) refers to the amount of attenuation (reduction in sound intensity) that occurs as the sound crosses from one cochlea to the other.
During pure tone audiometry, there can be times when the sound presented to the intended test ear is at a level (i.e. does not attenuate enough) where it can also be detected by the opposite, non-test ear. In these instances, it’s possible that a positive patient response may be generated by the patient hearing the sound in the non-test ear as opposed to the intended test ear. This can lead to incorrect test results being recorded.
To reduce the risk of cross hearing, you can apply masking noise to the non-test ear to temporarily elevate the threshold in the non-test ear. This works to prevent the non-test ear from being able to detect the stimulus presented to the test ear.
Masking noise stimulus and levels to be used
Narrowband noise should be used for masking, and this should be calibrated against the most recent ISO standard to effective masking level (EML). The amount of masking noise you need to apply is determined by the hearing thresholds recorded and the interaural attenuation values which vary depending on the transducer used.
The guidance on how to apply masking varies from country to country. Therefore, it’s recommended to refer to national and local guidance. The BSA (2018) adopts the following recommendations.
Rule 1
Masking is needed at any frequency where the difference between the left and right not-masked air conduction thresholds is 40 dB or more when using supra- or circum-aural earphones or 55 dB or more when using insert earphones.
Rule 2
Masking is needed at any frequency where the not-masked bone conduction threshold is better than the air conduction threshold of either ear by 10 dB or more. The worse ear (by air conduction) would then be the test ear and the better ear would be the non-test ear to be masked.
Rule 3
Masking will be needed additionally where Rule 1 has not been applied, but where the bone conduction threshold of one ear is more acute by 40 dB or more (if you have used supra or circum-aural earphones) or 55 dB or more (if you have used insert earphones) than the not-masked air conduction threshold attributed to the other ear.
Patient instructions for masking
It’s important to instruct the patient appropriately before employing the use of masking noise. The BSA (2018) recommends instructions similar to the following:
“In this next test, you will hear the sounds (tones) again, just as before. I would like you to press the button as soon as you hear the sound (tone) starts and release it as soon as it disappears. Do this even for the very faint sounds (tones), and no matter which side you seem to hear the sounds (tones). For some of the time, you will also hear a steady rushing noise, but I want you to ignore it and press the button only when you hear the sounds (tones). This steady rushing noise will get louder at times. I want you to tell me if any of the sounds become uncomfortably loud, or if you would like me to explain the test again.”
You must not tell the subject to expect to hear the pure tone in the test ear. The very fact that masking noise is required means that it’s not known which ear is picking up the signals.
Masking procedure
Now we’re ready to begin the masking procedure.
1. Re-establish hearing threshold without masking noise
Re-establish the hearing threshold in the test ear by presenting the tone and seeking the response without masking noise to remind the subject what to listen for. This is always necessary for bone conduction because the occluded, not-masked hearing threshold level is required.
2. Introduce masking noise to the non-test ear
The initial level of masking should be the effective masking level which is equal to the tonal threshold level of that ear at that frequency. Wait a few seconds in case the subject mistakenly responds to the introduction of the masking noise (a response at this stage may require brief reinstruction).
3. Re-establish hearing threshold with masking noise
This is done by using the same procedure as described above. Take this tone level as the pure-tone threshold at that level of masking.
4. Increase level of masking noise
Increase the level of masking noise by 10 dB. Re-establish the hearing threshold level in the test ear. Take this tone level as the pure-tone threshold at that level of masking.
5. Repeat in increments of 10 dB
Continue to repeat Step 4, using increments of 10 dB in masking noise, until you have at least four measurements (including the initial starting point) and until three successive measurements yield the same tonal threshold. You may be unable to obtain this plateau if you reach the maximum level of the audiometer or because the subject finds the masking noise uncomfortable. In either case, mark as unreached.
6. Establish the plateau
When three successive levels of masking yield the same tonal threshold, or one threshold is no more than 5 dB different from the other two, this is the ‘plateau’. The mode (i.e. the threshold which occurs 2/3) of the three hearing threshold levels at plateau is taken as the correct hearing threshold of the test ear and no further masking is required. Withdraw the masking noise and plot the hearing threshold level on the audiogram.
Results interpretation
The results of pure tone audiometry are typically recorded on an audiogram. Hearing thresholds are generally reported in relation to the following criteria.
1. Severity
The hearing loss severity can be normal, mild, moderate, severe, or profound (see Table 2).
| Hearing loss severity | Range |
| Normal | -10 to 20 dB HL |
| Mild | 21 to 40 dB HL |
| Moderate | 41 to 70 dB HL |
| Severe | 71 to 95 dB HL |
| Profound | More than 95 dB HL |
Table 2: Types of hearing loss severity.
2. Laterality
A hearing loss affecting both ears is described as bilateral, whereas a hearing loss affecting one ear is descried using the term unilateral.
3. Symmetry
A hearing loss affecting both ears to the same extent is described as symmetrical, whereas a hearing loss affecting both ears differently is asymmetrical.
4. Nature
The nature can be described as sensorineural, conductive, or mixed. These names have been created based on how the thresholds measured with air conduction compare to the thresholds using bone conduction (see Table 3).
| Nature of hearing loss | Air conduction threshold | Bone conduction threshold | Air-bone gap | Origin of hearing loss |
| Sensorineural | More than 20 dB HL | More than 20 dB HL | Less than 10 dB HL | Cochlea |
| Conductive | More than 20 dB HL | Less than 20 dB HL | More than 10 dB HL | Middle ear |
| Mixed | More than 20 dB HL | More than 20 dB HL | More than 10 dB HL | Middle ear and cochlea |
Table 3: Types of hearing loss nature.
5. Shape
The term ‘slope’ is often used to describe whether the hearing loss is worse in the low frequencies (reverse sloping) or high frequencies (high-frequency sloping). The term ‘cookie-bite’ is often used to describe a hearing loss which is worse in the mid frequencies than in the low/high frequencies. The term ‘ski-slope’ refers to a high-frequency-sloping hearing loss which changes severity sharply across a narrow frequency range.
Example
When a set of thresholds ranges across one or more of these descriptors, they are often used within a sentence to add clarification. For example, a patient could present with a bilateral, symmetrical, mild-to-severe, high-frequency-sloping, sensorineural hearing loss (Figure 3).

Different countries may use different hearing loss severity categories and it’s advised for hearing care professionals to refer to their local or national guidelines.
Summary
Pure tone audiometry is a valuable part of the hearing test battery that is straightforward to perform for the vast majority of the patient population. However – to ensure the best patient outcomes with hearing aids – it should not be the sole test used in the hearing aid fitting process.
Related courses
References
[1] British Society of Audiology. (2018). Pure-tone air-conduction and bone-conduction threshold audiometry with and without masking.
[2] ISO - International Organization for Standardization. (2021). ISO 8253-1:2010 audiometric test methods.
Presenter
