
Training in RECD
Real-ear-to-coupler difference (RECD): An Introduction
Description
The real-ear-to-coupler difference (RECD) is the difference between the coupler response and the real ear response. This guide will provide an introduction to RECD testing.
Table of contents
- Why does hearing aid verification matter?
- When to perform RECDs?
- How do the different RECD transducers available compare?
- Performing an RECD using the SPL60 probe
- Performing an RECD on a pediatric patient
- Tips and tricks: How to get a good RECD
Related course: Getting started: RECD
Why perform hearing aid verification?
Whenever you fit a hearing aid, you need to confirm that it's performing in a certain manner and providing benefit. And this is where verification comes into the picture, which ensures that the output of the hearing aid is correct as per the individual patient.
Let’s dive into some of the specific benefits of performing verification a little further.
Accommodate for ear canal shape and size
One of the specific ways in which patients vary is the size and shape of the ear canal. Thinking of ear canals along a spectrum, they can be short to long, and they can be narrow to wide. And age can have a big effect on ear canal characteristics.
All this can impact the sound as it travels towards the eardrum. And we want to how much sound is reaching the eardrum. So the way that you do that is to perform real ear measures, which measure – and account for – ear canal effects in the hearing aid programming.
Time-saving benefits of hearing aid verification
One concern that many clinicians have is the amount of time that it takes to perform real ear measures. And that's a valid concern, especially in the context of the audiology process. For any individual patient, you'd need to:
- Take a history.
- Perform diagnostics.
- Explain those results.
- Counsel the patient.
- Program the hearing aid.
- Select appropriate settings for that individual.
- Instruct the patient on cleaning and insertion.
- Perform some form of hearing aid validation.
- Do any required fine tuning and follow-up adjustments.
So when you add real ear measures into that equation, then you can end up with having quite a lot to do for every individual.
However, studies have been conducted which show that by performing verification, then you can reduce the amount of time that you spend with the patient in the hearing aid fitting journey.
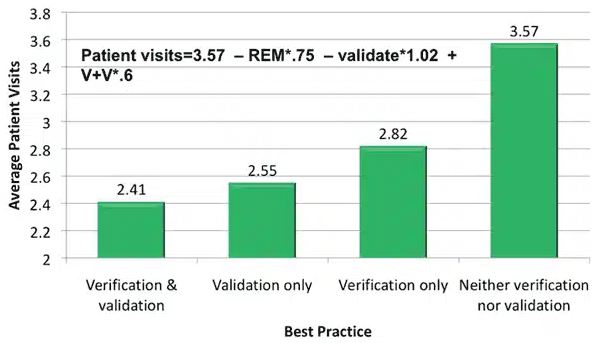
In 2011, Kochkin [1] published data that shows when you don't perform any verification or validation, then you on average will see patients over three and a half times. When you then add verification and/or validation, you can significantly reduce the amount of patient visits (Figure 1).
Improve patient satisfaction and willingness to pay
Not only do you save time, but by doing real ear verifications, then you can also improve patient satisfaction. By improving satisfaction, this can lead to:
- Positive reviews
- Positive word of mouth
- Increased customer loyalty
- Increased willingness to pay
If we turn our attention to the latter, this was actually assessed by Amlani et al. in 2016 [2].
Patients were divided into experienced hearing aid wearers, those that have hearing aids but keep them in the drawer or rather don't wear their hearing aids, and those that were wearing hearing aids for the first time. Some patients were fitted without REM, and some were fitted with REM.
Figure 2 shows the mean willingness to pay across the three hearing-aid-wearer groups based on the type of hearing aid fitting performed.
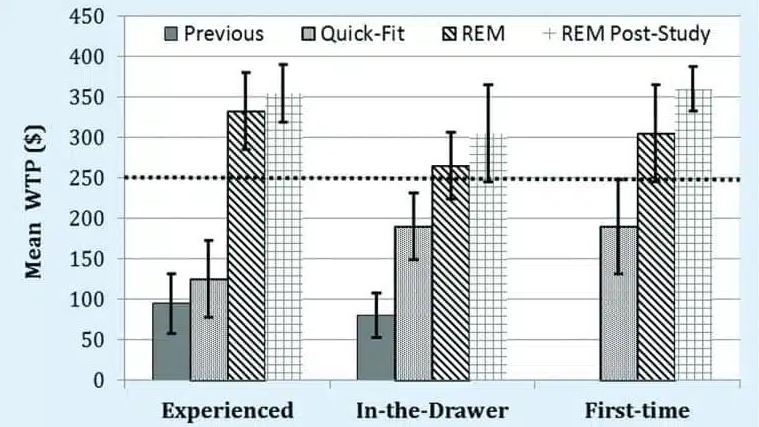
You can see that when real ear measures are involved, patients are willing to pay more. This is a clear indicator that their satisfaction with that entire process has increased.
When to perform RECDs?
So how about those patients that you can't do real ear measures with (Table 1)?
| Patient population | Non-compliance with real ear measures |
| Pediatrics | Unable to stay still and quiet |
| Immobile | Unsafe to maintain same position for an extended period of time |
| Reduced contact | Unsafe to be in close contact for an extended period of time (e.g. virus spread) |
| Complex needs | Unable to go through the entire process |
Table 1: Patient populations in which real ear measures can be difficult to complete.
This is where the real-ear-to-coupler difference (RECD) comes into play, which allows for hearing aid verification with very little compliance from the patient. So rather than needing the patient to be compliant and sit still and quiet throughout the process, you can take one measurement of the real ear and use this to augment the response of a coupler.
The basic RECD process
Using the setup shown in Figure 3, let’s briefly go through the process. Later in this article, we’ll go into more detail with videos.
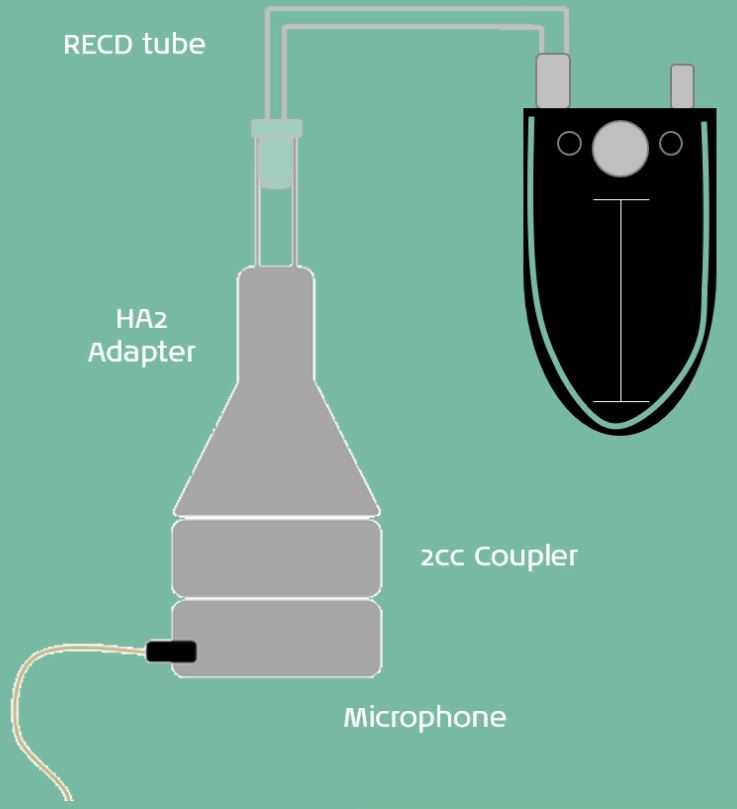
1. Measure the coupler response
As shown in Figure 3, you use a 2cc coupler to replicate an ear, and is the approximate volume of an adult ear.
First, play a stimulus into the 2cc coupler and measure the coupler response using the microphone.
2. Measure the real ear response
Next, you need to measure the real ear response. While using the same transducer and RECD tube, place a probe microphone into the ear to measure the response at the eardrum. Make sure to play the same stimulus used to measure the coupler response.
The real-ear-to-coupler difference is the difference between the coupler response and the real ear response.
3. Fit to target
Now you can place the hearing aid into the coupler connected to the HA2 adapter and fit it to target. So using your hearing aid software, you can analyze the real ear aided response of the hearing aid in the coupler.
To do this, measure the response of the hearing aid in the coupler and then apply the RECD. This allows for the individual's ear canal characteristics to be accounted for.
How do the different RECD transducers available compare?
For many years, there were two transducer options available:
- The patient's own earmold
- Or a standard foam insert tip as used in audiometry
Recent advances in technology have led to the development of the SPL60 probe, offering a third option for performing RECD measurements.
Table 2 lists recommendations for which equipment setup to follow depending on the transducer being used. It is important to be aware of these recommendations before performing audiometry.
| Transducer for audiometry | Transducer for RECD | Coupler adapter for RECD |
| Earmold | Earmold | HA2 (BTE) |
| Insert foam tip | Insert foam tip | HA1 (non-BTE) |
| Insert foam tip | SPL60 probe | HA1 (non-BTE) |
Table 2: Recommended transducer and coupler adapter setups for RECD based on transducer used for audiometry.
You can watch short examples for each of the three RECD transducers below.
Earmold
The following video demonstrates the practical steps involved in performing an RECD using the patient's earmold. Please note: there is no spoken audio to this video.
Insert foam tip
The following video demonstrates the practical steps involved in performing an RECD using an insert foam tip. Please note: there is no spoken audio to this video.
SPL60 probe
The following video demonstrates the practical steps involved in performing an RECD using the SPL60 probe. Please note: there is no spoken audio to this video.
Performing an RECD using the SPL60 probe
So far, we have seen a glimpse into using the SPL60 probe. In the following video, we'll see the detailed step-by-step process for measuring an RECD with the SPL60 probe. You can read the full transcript below the video.
Click here to read the full transcript
An alternative method of performing an RECD measurement involves using the SPL60 probe. Now this is a good alternative when you don't have the patient's earmold available or when their earmold is not a good enough fit to perform a good in-ear measurement.
The SPL60 probe is made up of two tubes that replace the probe microphone and the RECD tube. They are combined into one integrated unit with a tip on the end that is inserted into the patient's ear using a standard tympanometry tip. We connect the SPL60 probe to the REM headset like so. So the thicker tube goes on to the larger microphone port and the thinner tube goes on to the smaller one.
The process for performing an RECD measurement using the SPL60 probe is very similar to performing the measurement using a patient's own mold. Firstly, we need to look in the software and get set up. So you would enter all your details into the fitting prescription settings as normal and press OK.
The first thing that you need to do is perform a calibration of the SPL60 probe. This is different to the standard probe tube calibration. So when you click on the calibration button, you will have a pop up on the screen that invites you to select the correct probe type that you are using. When using the SPL60 probe, you need to select the SPL60 probe button and again follow the instructions on the screen to perform the calibration measurement.
Now that we've performed the calibration, we're ready to move on to performing the RECD measurement itself. And that is once again a two-stage process. We need to perform the coupler measurement first, and then we use the standard tympanometry tip to insert the probe into the patient's ear to run the ear measurements.
For the coupler measurement part of the RECD, you would need to use a different adapter. So we're using this one here, we would connect that to the coupler, and you insert the probe into the top like so. Then within the software, press the start button and once again you'll be guided through by the Affinity Suite to perform the measurement.
Now we have our coupler measurements, we can disconnect the SPL60 probe. Then we need to select an appropriately sized ear tip for the patient's ear size. Replace the tip over the end of the SPL60 probe. And then this is inserted into the patient's ear to run the in-ear measurements.
So in this case, we're placing the headset over the ears. It is also possible to again disconnect the headset from the hooks and we will insert the probe tip into the ear making sure we have a good seal. Back in the software again, we press the OK button to run the in-ear measurement.
Once again, you've got your coupler and ear measurements labeled separately. And the RECD is the thicker line at the bottom that you can then review to ensure that you've got good quality measurements.
Again, you'll be looking at a measurement that is above zero, so you want it to be largely positive. And we are looking at the part up to eight kilohertz being the important area to focus on in this measurement.
Now that we've got both stages of the RECD measurements recorded, we are ready to connect the hearing aid to the coupler and perform the verification process. So now we have our hearing aid ready to perform the verification, we need to remove the adapter from the coupler.
And we're using the HA1 adapter with some putty and the patient's earmolds to connect on to the coupler like so. Place it in the test box and once again position the reference microphone as close as possible to the hearing aid microphones. Then you can close the lid and you can go to your real ear aided response and run the measurement.
Once you've run your aided response measurement at 65, then you can perform any changes to the gain in the hearing aid software. Continue to verify at another level of 65, 55, 85, and your maximum output. And then you can switch the hearing aids on in the patient's ears and assess their subjective response.
Performing an RECD on a pediatric patient
So far, we have learnt about RECDs, the different transducer options available, and seen an in-depth video on how to use the SPL60 probe for RECD measurements. Now, let's take a look at how to perform RECDs in a pediatric patient.
Pediatric RECD measurement using SPL60 probe
Next up, we will see a video which shows how to perform an RECD from start to finish using the SPL60 probe, including the verification of the hearing aid. You can read the full transcript below the video.
Click here to read the full transcript
So today I'm going to be doing an RECD on a 4-and-a-half-year-old girl. She's waiting outside in the waiting room for me. And what I'm going to do is do as much of the procedure as possible without her, because she might come in and be a little bit noisy and distracting, and the parents might have some questions. It's a nice idea to get everything ready as best possible.
So what we can do without her in the room is calibrate the SPL60 probe, which is what I'm going to be using for her RECD today. And I can also perform the coupler part of the measurement, then I'm completely ready. Everything's done except for the ear measurement.
So I can then bring her in, perform the ear measurement, and then we're ready to verify the hearing aid, which again, is something that we could do with her out in the waiting room so that she's not causing any distractions or making any unnecessary noise.
So this is the SPL60 probe. To calibrate it, you need to place this tip between the two markers so that it's held against the microphone. And then you can hold that in front of the speaker whilst the calibration sound is being played.
So that's the calibration complete. Now we're ready to perform the coupler part of the RECD measurement. So what we need to do is place this inside the coupler like so, and we are ready to press start. On the Affinity screen, it talks you through the steps with images to show how to get everything set up. And that's the coupler part of the RECD measurement complete.
Now we're ready to bring our patient in and perform the ear part of the measurement. Let's try a blue one. So Ivy, what we're going to do... you see this little blue mushroom here? Yeah. I'm just gonna pop it in your ear. And you're gonna hear a funny sound. Yeah. But your job is to stay super quiet and still like sleeping lions. Have you played sleeping lions before?
Yeah. Yeah, so you're going to be a sleeping lion. But you're going to be standing up. Is that okay? Yeah. Alright, so this is just gonna go in your ear. You'll hear a funny sound, it's gonna take 1...2...3... And then we'll take it out and we'll be done. All right. Okay, fantastic. I'll just move your lovely hair out of the way.
Good stuff. Here we go. A little tickle in your ear. Good job. Fantastic. Give me high five. Yay, good job.
We're now ready to insert the hearing aid into the test box. Because the RECD was measured using the SPL60 probe, we need to connect the hearing aid to the earmold and then use acoustic putty to attach that to the HA1 adapter. This is then connected to the coupler like so.
And we're ready to run an aided response at a level of 65 which is a moderate speech intensity and verify the hearing aid. Once we're happy with our verification at 65, we can move on to verify at 55. This represents the softer components of speech. Once 55 has been verified, we can move on to present a loud intensity at a level of 80.
Once we're happy with the level of 80, we can move on to run a sweep at 90. This ensures that we can check that the hearing aid doesn't exceed the patient's uncomfortable loudness levels.
Pediatric RECD measurement using patient's own earmold
In this video, we will see the RECD performed using the patient's earmold. The hearing aid verification steps are not shown - these are the same as shown in the previous video. You can read the full transcript below the video.
Click here to read the full transcript
So today I'm going to be performing an RECD measurement on a 4-and-a-half-year-old child. She is outside in the waiting room waiting for me. But what I'm going to do before I bring her in, is as much of the procedure as possible without her. She might come in and be a little bit noisy, a little bit distracting, and her parents might have some questions.
So what we can do without them in the room is calibrate and we can also perform the coupler part of the RECD measurement. When those two things are done, we're ready to move straight into the ear part of the measurement. And then we can ask her to take a seat back in the waiting room whilst we verify the hearing aid.
So today we've got the patient's earmold ready to perform. So we're using the regular probe and now we can get on and start the measurement. So this is the regular probe for performing an RECD measurement. This is what you would use when you have the patient's earmold available for the RECD.
First thing we need to do is perform a calibration. So we take the thinner of the two tubes and place that in the holder against the microphone and then we can hold that in front of the speaker to present the calibration sound.
So that's the calibration complete. Now we're ready to move on to perform the coupler part of the RECD measurement. So we take the thicker of the two tubes and we need to connect this to the coupler.
Now we're ready to press start and that's the coupler part of the RECD measurement complete. Now we can bring our patient in and perform the ear part of the RECD measurement using their ear and their earmold.
Good girl. One more sweetheart. One more. Fantastic. Thank you so much.
Tips and tricks: How to get a good RECD
When performing an RECD measurement, there are some helpful tips, tricks and ideas on how to get a good measurement. There are also some clever ways of managing your RECD results in different circumstances.
Probe microphone insertion
With both REMs and RECDs, probe microphone insertion is often the most daunting part of the process. Making use of the SPL60 probe simplifies this step, as there is only one object to insert into the patient's ear, with the probe microphone built into the probe, making it a very easy and quick way of achieving an accurate measurement.
However, when using the patient's own earmold, or an insert foam tip, it is necessary to insert the probe microphone alongside either of these. This can be a somewhat fiddly process made more challenging if there is some patient movement and by the small ears of pediatric patients.
Firstly, it is important, as with REMs, to ensure the probe microphone is marked to the correct length for insertion. For pediatric patients, it is recommended to insert the probe microphone a few millimeters beyond the end of their earmold, the SPL60 probe, or the foam tip.
The SPL60 probe accounts for this with its design. However, when using an earmold or foam tip, you should position the probe microphone alongside, a few millimeters beyond the end, and move the black marker so that it is in line with the outer edge of the earmold or foam tip.
Once the correct probe microphone length has been established and marked, the next step is to insert the probe microphone into the ear canal. There are two ways of doing this, each with their own advantages.
First, it is possible to insert the probe microphone into the ear canal on its own, followed by the earmold or foam tip. This is typically the standard way of performing probe tube insertion for real ear measurements. This is a two-step process but benefits from being easily adjustable, should the probe microphone need re-placing if the measurement is not deemed appropriate.
Alternatively, the probe microphone can be attached to the earmold or foam tip before insertion. This can be done by using a small strip of micropore tape to wrap around the earmold or foam tip with the probe microphone alongside it. Be careful to ensure the probe microphone remains in the correct position for the appropriate length.
Another similar technique is to cut a small strip of clingfilm (cellophane / saran wrap) and wrap this around the earmold or foam tip, connecting the probe microphone to it. Some clinicians also choose to then apply some lubricant to the outside of this setup to ease insertion.
This technique means there is only one combined object to insert into the ear. This does require a bit more preparation and is less easily adjustable if the probe microphone needs replacing.
Once the measurement is complete, the software will display the coupler measurement, the ear measurement, and the RECD value, which is the difference between the two. After this, it is possible to then perform hearing aid verification in the coupler.
Inspecting your RECD
It is important to inspect your RECD to ensure that it is a good quality measurement. A good RECD should be above 0, largely positive, focusing on the area up to 8 kHz. It is also possible to compare the RECD against predicted RECD data, which is based on average measurements across a larger number of patients.
To do this, the Affinity Suite can display the predicted RECD on the opposite ear to the one that has been measured. Then it is possible to select ‘binaural view’ to see the two measurements overlaid (Figure 4).

This can provide a useful comparison. However, individual variations are to be expected, particularly if there are middle ear abnormalities such as negative pressure effusions or PE tubes.
Copying measurement in one ear to the other
The gold standard of RECD measurements is to perform the measurement in each individual ear. However, this is not always possible due to patient cooperation. Therefore, it is possible to perform the measurement in one ear and copy it across to the other. This should only be performed when the anatomy and middle ear function of both ears is similar.
To copy the measurement to the opposite ear, right click on the measurement in question, which is a left sided RECD in this case, and select ‘Transfer to right ear’.
Then when the right ear is selected, the left sided RECD has been copied over but is still displayed in the original color to make it clear which side the measurement was performed on. It is then possible to verify the right sided hearing aid using the left sided RECD.
Predicted or previous RECD
Sometimes it isn't possible to record an RECD at all. This can happen for a number of reasons. For instance, perhaps the patient is not sufficiently cooperative or maybe there is excessive wax in the ears, or they present with an ear infection on the day of the measurement.
In these cases, it is possible to use the predicted RECD by clicking on RECD for the ear in question and selecting ‘Show predicted RECD’. This can then be used for the verification process.
Another option in these circumstances is to use a previously measured RECD for that patient. Although this won't be as current as a newly measured RECD, it is considered more accurate than using predicted RECD measures.
To use a previous RECD, select the previous session where the measurement is saved, right click on the measurement in question, and select ‘Transfer to current session’. Return to the current session and the previously measured RECD has been applied ready for verification of the hearing aid.
Related courses
References
[1] Kochkin S. MarkeTrak VIII: Reducing patient visits through verification and validation. Hearing Review. 2011;18(6):10-12.
[2] Amlani AM, Pumford J, Gessling E. Improving Patient Perception of Clinical Services Through Real-ear Measurements. Hearing Review. 2016;23(12):12.
Presenter
