

Pure Tone Audiometry
What is pure tone audiometry?
Pure tone audiometry is a hearing test that establishes hearing sensitivity at various frequencies for air conduction and bone conduction. The test can specify the air conduction and bone conduction loss and distinguish between abnormality in the conductive mechanism and sensor neural mechanism. Masking can be applied to both the air conduction and bone conduction threshold to establish pure tone thresholds.
Required accessories
- Headphones or insert phones
- Bone oscillator
- A response button
How to perform pure tone audiometry on the AA222
- Turn on the Audiometer.
- The Audiometer stats up in the Tone Audiometry screen by default.
- Settings of view and default test procedure can be set temporary or permanent from Setup │Tone settings. By saving the user setting you created, the system will start up in your preferred protocol
- The light indicators on the audiogram will indicate the transducer type, stimulus type, ear, etc.
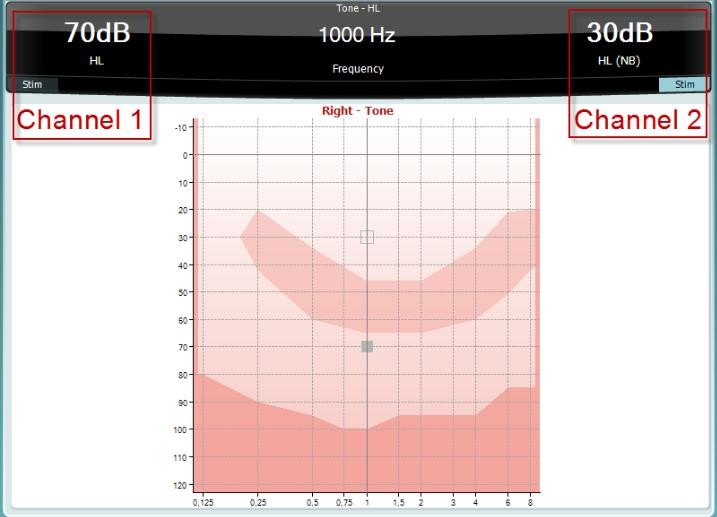
- Use the Right wheel to control channel 1 and adjust the intensity level of the stimuli.
Use the Frequency Down/Up to change frequency.
Use the Left wheel to control channel 2 to apply and adjust the masking level. - Press Store to store a threshold.
For a more detailed description on how to use the stand-alone audiometer, please refer to the relevant Instructions for Use.
How to perform pure tone audiometry in Diagnostic Suite
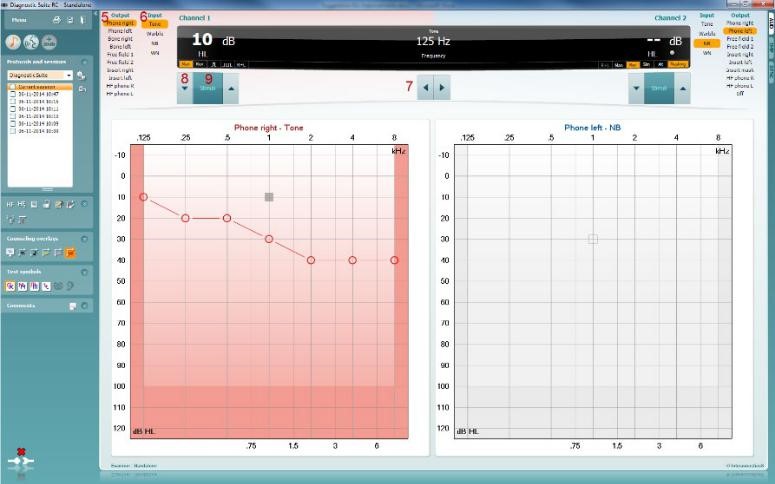
1. Launch the audiometer PC controlled from the Diagnostic Suite as stand-alone or from NOAH or OtoAccess.
2. Click on the AUD tab on the upper right hand side of the screen.
3. Click on the icon to launch the tone audiometry screen, if Tone audiometry is not the default screen.
4. Select the desired Audiometry protocol from the Protocols and Sessions drop down list.
5. Choose the transducer type and stimulus type, if not already predefined from the Protocol Setup.
6. The Frequency range can be operated from the PC keyboard with the mouse or from the audiometer:
- Audiometer: Frequency Down/Up
- PC Keyboard: Right/left arrow keys
- Mouse mode: Left/Right arrow buttons
7. Choose the intensity:
- Audiometer: Use the Right wheel
- With PC keyboard: Use the up/down arrow keys
- Mouse mode: Up/Down arrow buttons
8. Presenting the stimuli:
- Audiometer: Use the Tone Switch
- PC Keyboard: Press on the space bar or left Ctrl button
- Mouse mode: Hover the mouse over the Stimuli button
9. If masking is necessary:
- Turn on masking in Channel 2 by ensuring that the desired transducer is selected for non-test ear
- Ensure that the word Masking is highlighted in orange
- Choose Rev to present the masking noise continuously
- It is also possible to turn on Auto masking or Masking help
It is possible to define the output of channels for each protocol from the protocol settings.