
Training in Visual Reinforcement Audiometry (VRA)
Visual Reinforcement Audiometry (VRA): A Complete Guide
Description
This guide provides a complete introduction to visual reinforcement audiometry (VRA) testing.
Table of contents
- What is visual reinforcement audiometry (VRA)?
- Testing considerations
- Minimum response levels
- Preparation and setup for VRA testing
- Choice of VRA system
- The role of the second tester
- How to avoid pitfalls in VRA testing
What is visual reinforcement audiometry (VRA)?
Visual reinforcement audiometry (VRA) is a behavioral test of hearing best suited for infants from six months to around two and a half years of age. The aim of VRA is to identify minimum response levels at different frequencies to get information on the child's hearing.
VRA involves the child looking towards a visual target such as a toy or an image on a screen in response to a sound stimulus. If you’re using a toy, you should screen it from view of the child by smoked Perspex with the option to illuminate it when required to become visible.
An important aspect of VRA is the reinforcement element as the child sees the visual target each time they look towards it. But what exactly is being reinforced?
Principles of VRA testing
There are two main principles of VRA testing and it’s these that are reinforced by the presentation of the visual target.
1. Conditioning
The VRA response is a conditioned response. This means that the child associates the presentation of the sound stimulus with a reward. In this case, the visual target, which they receive upon performing a head turn towards that target. This concept of conditioning is the first principle.
2. Head turn towards the visual target
The second principle of VRA is that we must see that head turn towards the visual target. In some cases, you will hear this visual target described as a visual reward. But in fact, it’s a visual reinforcer because it serves the purpose of reinforcing the conditioned head‑turn response throughout testing.
Testing considerations
There are four main considerations for VRA testing.
1. Maximizing the time available
To maximize the time available – which is often limited due to the short attention span of infants – a 20 dB down, 10 dB up testing method is common. You should use smaller steps around the minimum response level. However, it’s important to weigh up the benefits of measuring in smaller steps against time limitations and the need for testing at further frequencies or using other transducers.
2. Recording responses
You should use a clear, time‑locked head turn as the response. Record all responses or lack of responses using ticks and crosses on a VRA tick sheet. This allows for clear reviewing of the test strategy and patient responses.
3. Reinforce simultaneously
You should display visual reinforcers as soon as the child has produced a head turn. It’s advisable to maintain the sound stimulus presentation for the same duration as you display the reinforcer to help maintain conditioning.
You should avoid presenting the stimulus and/or reinforcer for excessively long durations as this can lead to the child losing interest in the game. Long durations of reinforcement (4 seconds) have been shown to lead to faster habituation than shorter durations of 0.5 to 1.5 seconds (Culpepper and Thompson, 1994).
4. Engagement toys
The second tester should have a varied selection of age-appropriate toys to engage the child's attention forwards throughout testing.
Minimum response levels
The British Society of Audiology defines the criterion for a minimum response level as the lowest level at which a response occurs in at least two out of three ascending trials. That is: greater than fifty percent of the time.
In determining whether a response has been given, it’s important to be aware of false positives or checking. A false positive response occurs when the child checks to look for the visual reinforcer regardless of sound stimulus presentation.
If a checking response coincides with the presentation of the stimulus, it can be mistaken for a true positive response. You can use ‘no‑sound’ trials to find out to what extent the child is checking and an increase in the level of engagement with the second tester can help to reduce the amount of checking.
Preparation and setup for VRA testing
There are some specific considerations for the setup and preparation of VRA. We will explore how to ensure the appropriate test environment, how to furnish the clinic room, and how to prepare the different people involved in the test.
Test environment
Having an appropriate and dedicated testing environment is conducive to being able to perform high‑quality VRA.
Room size
The testing room should be large enough to accommodate:
- Both testers
- The child and their parent
- Required equipment and furniture
The British Society of Audiology recommends floor dimensions that are at least six by four meters.
Ventilation
The room should be well ventilated with adjustable air conditioning to ensure the comfort of the child.
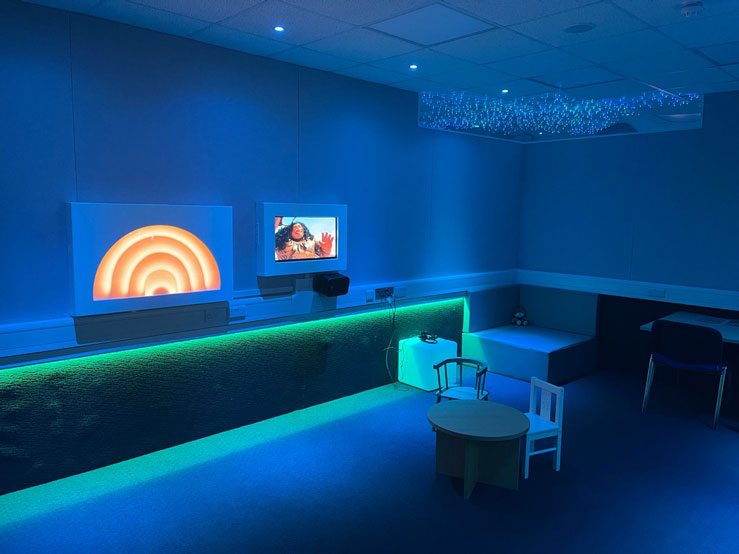
Lighting
Adjustable lighting is important in case you need more illumination of the visual reinforcers to assist in testing of children with visual impairments. Downlighting is ideal to avoid casting distracting shadows (Figure 1).
Soundproofing
The testing room should have adequate soundproofing for sound field testing.
Environmental sounds
You should avoid distracting environmental sounds. Suggestions include:
- Toys which make minimal noise
- Using a soft, wipeable covering to the table
- As few accompanying family members as possible
- Fit computers within the testing room with silent fans
- Avoid any siblings who may make noise and be distracting
Test room arrangement
Although many test room arrangements are used, the preferred setup is to use an observation room for testing. Tester one would be stationed in the observation room with the audiometer and VRA system controls. It’s vital that tester one has full observation of the child, second tester, and preferably the parents as well via a one-way window or camera image. Neither option should provide any form of distraction to the child.
Two-way communication
Reliable, two-way communication between both testers is essential. There are many options available. This could be via wired or wireless headsets or a hearing aid with FM mic and receiver. It’s vital for both testers to be aware of the test circumstances, timing of presentations, and to be able to communicate about any necessary changes to test strategy.
Distraction-free
The testing environment should be as tidy and distraction-free as possible to keep the child focused on the important elements of the test, the visual reinforcers, and the second tester with engagement toys.
Furnishing the clinic room
Now that we have our room requirements, we can go ahead and furnish the room.
Patient positioning
It’s advisable to place a mark in the middle of the room where you want the patient to be sitting for testing. This should be where the sound field system has been calibrated to.
Sound field speakers
You should position your sound field speakers one meter from the patient at 90 degrees azimuth. It’s important to avoid any reflective surfaces near or around the speakers.
Visual reinforcers
You should position the visual reinforcers as close as possible to the speakers and in line with the patient's head. This will elicit the strongest and clearest head turn and help with ongoing reinforcement. In the youngest VRA patients or in case there are any issues with vision development, a nice option to have available is the ability to move the reinforcers closer to the patient. Mounting the reinforcers on movable brackets or a stand with wheels are two good options here.
Arrangement of transducer cables
With the audiometer being in a separate room, it will be necessary to patch transducer cables through to the main testing room. It’s a good idea to label the different ports to avoid any incorrect connections. Extra‑long transducer cables are also important so you can position them out of reach and out of the patient’s view as much as possible.
Seating considerations
Next, we need a low table of a suitable height for a child. In an ideal world, the table height should be adjustable to remain comfortable for different seating types and children of different heights.
A horseshoe shaped table with the child seated in the gap in the center has the advantage of wrapping around the child. Combined with a good choice of chair, this can help encourage the child to stay seated in the correct location.
A soft table covering can help reduce unwanted noise from any engagement toys that might get tapped on the table.
We also need to seat the child on a chair. It’s good to have a seating option for the parent if the child is going to sit on their lap for testing. However, the first preference should be for the child to sit on their own chair. This minimizes the risk of cueing from the parents which can be hard to detect.
A small captain's chair offers the same advantage as the horseshoe table by wrapping around the child. It can help to keep them seated in position and should be as close to the table as possible, preferably with the arms resting underneath for most benefit.
Another great option to have available is a highchair. This is something most children of VRA age will be familiar with and comes with the benefit of straps to help keep the child in place. If a standalone highchair isn't an option, it’s also possible to get small, booster chairs which you can strap to a typical adult chair. Some come with their own tray table which the second tester can then place engagement toys on.
Engagement toys
Now that we have all our equipment and furniture in place, we need a plentiful supply of engagement toys. It's a wise idea to keep these in a box that you can hide out of view behind or under the table. A lid can also help to keep these out of sight.
To learn more about types of toys suitable for VRA, toy storage, and how to organize your toys, access this deep dive on toys for VRA and play audiometry.
People involved in the test
The final piece of preparation relates to the people involved in the test. Let’s say we have a scenario with our two testers, our patient, their parents, and a sibling who has joined the family for the appointment.
Number of people
The first recommendation in this scenario would be to ask one of the parents to take the sibling out of the room during testing. It's understandable that both parents would want to be present for the appointment. However, to reduce distractions, it would be best to ask them to leave and rejoin after testing.
Instructing the parent
You need to instruct the parent who remains in the room with the child. It’s important to explain the test to them in easy‑to‑understand terms. If the child will be sitting on their own chair, the parent must stay quiet and still throughout testing, ideally situated behind the child.
The child can detect even small movements, so instruct the parent to help them avoid cueing or distracting. Both testers should remain vigilant throughout testing on the possibility of parental cueing.
If the child sits on the parent's lap for the test, instruct the parent not to react to the stimulus or the reward. In certain cases, you can encourage the parent to provide supplementary social reinforcement. The parent should support the child around the waist and under their arms, holding them upright and with a gap between them and the child. It’s important the child remains alert throughout testing and is not tempted to relax back against the parent.
Ensuring cooperation from the patient
The patient's ideal state should be:
- Well rested
- Not hungry
- Not thirsty
- Not in need of a diaper change
The cooperation of the patient is essential to the success of a VRA session. Thus, avoid any possible sources of upset, need, or distress where possible. When booking the appointment, it’s worth asking if there is a good time of day. Avoiding nap times is always advisable.
Asking the parents ahead of time or at the start of the appointment about any preferences the child may have in terms of toys or visual reinforcers can give you useful information. Likewise, if the child has any particular aversions, it can be helpful to be aware of these.
It’s advisable to start testing when the patient is in the best state. If they are particularly shy, it may be worth spending more time to allow tester two to build up a rapport and engage the child in the session. If they are very active or appear to have a short attention span, starting testing as soon as possible may be the best course of action. You can always complete a full thorough history after testing.
It’s also worth judging whether to perform otoscopy, tympanometry, and OAE testing before VRA testing or whether to leave it until afterwards. Any procedure that may upset the child can risk losing their compliance and cooperation for the VRA test itself.
Choice of VRA system
One of the most exciting advances in the world of VRA has been the introduction of alternative methods of delivering visual reinforcement.
Traditional VRA systems
The original and classic VRA system involves using a box or series of boxes containing a puppet or toy (Figure 2).

This toy is screened behind smoked Perspex to make it invisible to the child in the clinic room. The tester has a switch, button, or foot pedal to illuminate the toy when required. The most advanced of these systems also have the option to animate the toy to make it more stimulating and rewarding to the child.
Drawbacks to toy VRA systems
There were and are some drawbacks to the toy VRA systems.
1. Limited selection of toys
Each system generally has a limited selection of one to three toys available, which can lose their effectiveness as the test duration goes on and the child grows used to seeing the same reinforcers each time.
2. Not interesting to older children
The toys are generally very effective for the younger end of the VRA age range but often not interesting enough to older children and for those with complex needs. Some clinics began to incorporate other forms of visual reinforcers such as flashing or spinning lights.
3. Old-fashioned
As the technological world has advanced and there is an increased number of screens accessible to young children through smartphones, tablets, and television, the toy system has begun to appear somewhat old‑fashioned. Many parents say that their children are more responsive to television and favored cartoons.
Modern VRA systems
In recent years, visual reinforcer systems have emerged that meet the needs of a modern, screen‑motivated child. Some early examples were quite basic, homemade systems. But these have now evolved into user‑friendly devices perfect for clinical use such as the VRA Screen (Figure 3) and VRA Pure solutions from Interacoustics.

A digital screen system typically involves software loaded onto either your audiometer PC or a standalone PC. The benefit of a standalone VRA PC is that it can work with a standalone audiometer or alongside a PC‑based audiometer, making it a very flexible solution.
TV or computer screens are used to display the visual reinforcer to the child via a control system such as a mouse or a keyboard. Digital VRA systems can also work alongside toy systems to provide both options as available reinforcers, which is useful in case certain children prefer and respond better to one type over the other.
Benefits of screen VRA systems
Screen VRA systems offer a wider selection of reinforcers, including the ability to create your own.
1. Selection of reinforcers
One of the advantages of using a digital screen VRA solution is the option to use both still and static images as well as moving video files.
2. Create custom reinforcers
By far the most exciting advancement in the field of VRA – made possible by screen VRA systems – is the option to customize the visual reinforcers. This allows almost endless possibilities as well as the opportunity to tailor the reinforcers used to the child's particular interests and motivations.
Read also: Creating Visual Reinforcers for VRA Testing
3. Random playlists
The Playlist Creator software – which is available with VRA Screen and VRA Pure – allows you to create random playlists (Figure 4), where you can mix up all the different types of visual reinforcers, such as:
- 3D models
- Still images
- Moving videos
- Homemade videos
- High-contrast images
- High-contrast animations
This can become part of the game where the engager is talking to the child and going “what's going to come next?” “Who's going to appear on the screen next?” That can be quite exciting because it's a different type of image every time.

The role of the second tester
The importance of the role of the second tester is often underestimated when it comes to VRA testing. Although it’s logical to see the first tester as the person leading the appointment, in actual fact, our second tester has a much more pivotal role when it comes to the cooperation of the child.
A happy child who is enjoying their VRA experience is one who is much more likely to produce results than an upset, scared, or nervous child. Whilst it’s not always possible to ensure we have a happy patient on our hands, there is a great deal that the second tester can contribute towards this.
Building a relationship with the child
The second tester should be in the testing room, sat in their position on the opposite side of the table before the child enters. They should have a toy or two on the table and should welcome the child into the room in a friendly, warm, and inviting manner. This way, the child has a welcoming focal point to go towards as well as those all-exciting toys.
Wearing non-medical clothing can help the child to see this experience as not threatening. While tester one takes a history from the parents, tester two has an ideal opportunity to build a friendly rapport with the child. The better the rapport between the child and the second tester, the more cooperative the child is likely to be.
As it will be the second tester interacting with the child for the test itself, it’s far more important that they – rather than the first tester – build this relationship with the child. Developing this rapport has a further benefit of helping the social reinforcement from the second tester to be more meaningful to the child. If the two are both enjoying the session and it’s a shared experience, the child has every reason to remain content and engaged throughout testing for as long as possible.
Although it can be tempting for reasons of efficiency to call the second tester into the room just as the VRA test is about to begin, this can actually be quite risky. Introducing a new face and expecting the child to perform almost immediately can disrupt the flow and introduce a source of unknown which can feel daunting or scary to that child.
Role during testing
During testing, our second tester has much closer contact with the child than tester one. It’s this – combined with their closer rapport and better understanding of the child – that places them in the most pivotal role.
Tester one should trust and accept guidance from tester two. They will be better placed to judge when to start testing and how the child's progressing throughout testing in terms of:
- Mood
- Interest level
- Attention span
- Degree of enthusiasm and engagement
It’s important that tester two recognizes the responsibility they have to feed back to tester one and is confident in contributing to the appointment. It’s often the case that trained and experienced clinicians find this easier and more natural to do than assistants or students. Clinicians who work together on a regular basis will also find this communication easier.
Engagement vs distraction
Our understanding of child psychology can inform how the second tester plays and interacts with the child. There can be a tendency to assume that VRA is quite a complex task for the child and as clinicians, we are very aware of the importance of obtaining results and the pressure of the limited attention span of such young children.
Often, it follows that the second tester interacts minimally with the child using only very basic play to distract them. However, young babies are actually capable of a lot more than we often give them credit for. If the visual reinforcer is motivating enough and conditioning has been successful, then a normally developing one-year-old child is quite capable of playing with a toy and having their attention drawn away by the stimulus at the same time.
This is where the concept of engagement rather than distraction becomes relevant. Some VRA guidelines and advice will encourage the second tester to distract the child. However, the British Society of Audiology's recommended procedure for visual reinforcement audiometry has adopted the importance of engagement, advising the second tester to engage the child in play rather than distract them.
Benefits of engagement
There are several reasons why the second tester should avoid simple distraction.
1. Keep appropriate focus
If you wave a toy in front of the child without them being able to play with it themselves, the chances are that child will try to reach for the toy. The problem we have here is that that unobtainable object has now become their sole focus and they are motivated by that toy rather than the visual reinforcers and the stimulus.
Allowing the child to play with the toy themselves means that their drive and their need to have the toy have been met. Their natural curiosity about what it does, how it feels and so on can be satisfied. This allows the stimulus and visual reinforcers to remain more motivating than the toy itself.
There is a balancing act in not giving the child too interesting or too complex a toy, or too many toys. Use their age as a guide as well as the second tester’s judgment of their developmental stage. For very young infants, waving a toy in front of them may be engagement enough but you should use social interaction as appropriate to ensure that it’s engaging rather than uninteresting distraction.
2. Maintain rapport and interest
If the child plays with the second tester, this continues to be an interesting and enjoyable experience for the child and further cements that rapport that the child and the second tester have developed before testing began.
If the second tester becomes distant as soon as testing starts, this could be upsetting and confusing for the child. And if the toys aren’t interesting, they will soon grow bored of the task and the appointment. Remember, the happier the child is and the more they enjoy the experience, the more attention span and testing time you will have available.
3. Reduce checking and false positives
Employing engagement type play rather than distraction techniques is a powerful tool in reducing checking and false positives. The ongoing principle must be maintaining the correct balance of the stimulus and visual reinforcers being more motivating than the engagement toys. But not to such an extent that they hold the child's sole focus.
If the stimulus and visual reinforcers are more motivating than the engagement toys, there is a higher risk of checking and false positives. The degree to which they will be motivating will vary for each child. But if such a scenario occurs, increasing the amount of engagement with tester two and the toys can help to rebalance the child's focus attention and motivation away from the stimulus and visual reinforcers.
4. Support social reinforcement
Engagement type play can help to support social reinforcement. The need for social reinforcement to supplement the visual reinforcers will vary according to each child. However, with the joint play that comes with engagement rather than distraction also comes a greater rapport and trust between the tester and the child.
If the second tester is excited and enthusiastic about the visual reinforcers, the child will absorb and imitate this reaction. If the child trusts the second tester and sees them as a new friend, the shared experience of the VRA test will be positive and enjoyable.
Uninteresting and dull engagement will weaken this bond, meaning the social reinforcement could lack the influence and power it otherwise would have carried.
How to avoid pitfalls in VRA testing
Performing good quality VRA can be a complex task and it’s important to be aware of possible pitfalls and sources of error. The British Society of Audiology's recommended procedure has highlighted the most common of these pitfalls, and we'll take a look at how we can address some of these below.
Pitfall 1: Inadequate test setup and communication
The first pitfall listed in the BSA recommended procedure is inadequate test setup and communication between testers. To address this, review this video on VRA preparation and assess your VRA testing room and environment with a critical eye to see if you can make any improvements.
One of the best investments you can make is providing a two-way communication system for your testers. It's also worth discussing the roles of the testers as a clinical team to ensure everybody knows and is aware of their responsibilities and all team members feel confident fulfilling their roles.
Pitfall 2: Conditioning to sub-threshold stimuli
It can be easy to attempt to condition to sub-threshold stimuli if the child's hearing levels are unknown. To select an appropriate conditioning level, look into the patient’s case history and any other test results including previous hearing levels if available.
If conditioning is not working, trying vibrotactile stimulation can help to establish whether you can condition the patient to this type of task using a non-auditory stimulus. This can show that they couldn't hear the auditory stimulus, or they are not ready for this type of task.
Using insert earphones or headphones offers the option of going louder than is safe in the sound field. But be careful not to present at uncomfortably loud levels.
Before progressing with testing, always confirm that you have conditioned the child by checking for those two independent head‑turn responses.
Pitfall 3: Incorrect scoring as true responses
Accepting a movement other than a clear head turn or accepting a checking response is one of the most problematic errors made in VRA testing. It’s important to focus on that clearly defined head‑turn response and for the testers to be confident in what that head‑turn response looks like for an individual child. Being able to differentiate between that and a checking response, which is often much faster and briefer, is crucial.
Using ‘no‑sound’ trials throughout testing can help to identify checking responses.
Reading the child and the testing scenario allows for the best timing of stimulus presentation.
It’s also important to avoid introducing tester response bias. If the tester believes or wishes that the child's hearing is normal, then this can lead to a lack of objective interpretation. We should never assume normal hearing or be trying to prove normal hearing. Our role is to assess and record results whatever they may be.
Pitfall 4: Response cues given to the patient
The second tester must be aware of how they play and interact with the child. Phasing their attention to a slow or a complete stop at the same time as the stimulus presentation occurs risks cueing the child and recording a false positive response.
Maintaining appropriate engagement throughout testing is essential.
The second tester must ignore the stimulus presentation and keep up their play. The head‑turn response of an engaged child is a reliable response.
The child’s parents also risk providing cues. So you should instruct them appropriately and both testers should remain alert to any potential cues.
Pitfall 5: Overemphasis on quantity
It’s understandable to want to get as many results as possible in a given session. However, testing one or two frequencies reliably is worth much more than rushing through four or more frequencies with questionable reliability. It’s always worth investing time in correct, effective conditioning at the start of the session rather than hurrying down to quieter levels.
VRA requires patience and if you present stimuli rhythmically, then the child's responses can also become rhythmic. Varying stimulus presentation timing and using a healthy number of ‘no‑sound’ trials will add to the reliability of the test.
Once again, we should never assume normal hearing or be hoping to record normal hearing.
References
[1] Culpepper, B., & Thompson, G. (1994). Effects of reinforcer duration on the response behavior of preterm 2-year-olds in visual reinforcement audiometry. Ear and hearing, 15(2), 161–167. https://doi.org/10.1097/00003446-199404000-00005
Related courses
Presenter
